Tested with USD 26.08
Transformations, Animation, and Layer Offsets
This tutorial builds an example scene of a spinning top toy that illustrates the following topics:
We create the scene by starting with a USD file with static geometry, referencing it into another USD file, overlaying animation, and then using a third USD file to reference and re-time that animation.
To fully illustrate these concepts, we walk through a Python script that performs these steps using the Python USD API, as well as showing the resulting text .usda outputs.
The scripts and data files exist in the USD distribution under USD/extras/usd/tutorials/animatedTop. Run generate_examples.py in that directory to generate all of the snippets for each step shown below.
Static Geometry
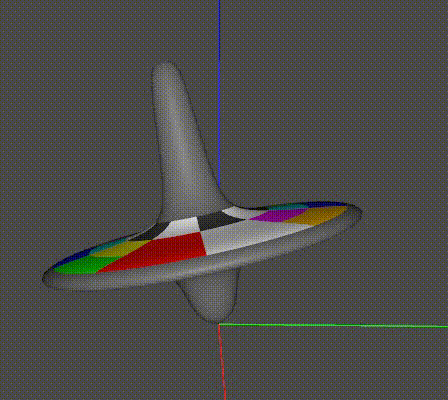
The toy geometry was modeled in Houdini as a revolved curve, followed by per-face color assignments as Houdini vertex attributes. The model was exported to the file USD/extras/usd/tutorials/animatedTop/top.geom.usd.
The USD distribution ships with usdview, a lightweight tool for inspecting USD files. Running usdview on the file, we can see that the geometry looks like this:
Choosing an “Up” axis
Computer graphics pipelines almost always pick an axis to represent the “up” direction. Common choices are +Y and +Z.
As a pipeline interchange format, USD provides ways to configure a site default, as well as to store an explicit choice per-file. See Encoding Stage UpAxis for details.
In the examples here, we use +Z as the up axis, and write this choice out in every file so that they will work regardless of your site configuration.
Moving Objects with Animated Transformations: Spinning the Top
Let’s make the top spin. In a typical production pipeline, rigging & animation would be set up in a dedicated package and the results exported to USD. Here, we will create the USD files by hand to illustrate the underlying concepts.
Adding animation requires authoring values that change over time. USD represents time value using unitless timeCodes and a scaling of timeCodes to real-world seconds. To establish the time range over which values are animated, the root layer can specify start and end timeCodes and a timeCode scaling in its layer metadata. For this tutorial we will use USD’s cinema default of 24 frames per second and specify a range of 8 seconds in Step1.usda:
# This is an example script from the USD tutorial,
# "Transformations, Animation, and Layer Offsets".
#
# When run, it will generate a series of usda files in the current
# directory that illustrate each of the steps in the tutorial.
#
from pxr import Usd, UsdGeom, Gf, Sdf, Ts

def MakeInitialStage(path):
    stage = Usd.Stage.CreateNew(path)
    UsdGeom.SetStageUpAxis(stage, UsdGeom.Tokens.z)
    stage.SetStartTimeCode(1)
    stage.SetEndTimeCode(192)
    return stage

def Step1():
    stage = MakeInitialStage('Step1.usda')
    stage.SetMetadata('comment', 'Step 1: Start and end time codes')
    stage.Save()
#usda 1.0
(
    "Step 1: Start and end time codes"
    endTimeCode = 192
    startTimeCode = 1
    upAxis = "Z"
)
You can run usdview on this file, but the viewport will be mostly empty since we haven’t added any geometry.
Let’s add a reference to the static top model, using the UsdReferences API:
def AddReferenceToGeometry(stage, path):
    geom = UsdGeom.Xform.Define(stage, path)
    geom.GetPrim().GetReferences().AddReference('./top.geom.usd')
    return geom

def Step2():
    stage = MakeInitialStage('Step2.usda')
    stage.SetMetadata('comment', 'Step 2: Geometry reference')
    top = AddReferenceToGeometry(stage, '/Top')
    stage.Save()
#usda 1.0
(
    "Step 2: Geometry reference"
    endTimeCode = 192
    startTimeCode = 1
    upAxis = "Z"
)

def Xform "Top" (
    prepend references = @./top.geom.usd@
)
{
}
This adds a Top prim to our scene, with the details referenced in from the geometry file.
Why prepend?
You may have noticed the prepend operation in the reference statement above. Prepend means that, when this layer is composed with others to populate the stage, the reference will be inserted before any references that might exist in weaker sublayers. This ensures that the contents of the reference will contribute stronger opinions than any reference arcs that might exist in other, weaker layers.
In other words, prepend gives the intuitive result you’d expect when you apply one layer on top of another. This is what the UsdReferences API will create by default. You can specify other options with the position parameter, but this should rarely be necessary.
Next, let’s add animation overrides to make the top spin.
Spatial transformations, such as rotations or translation, are a standard concept in computer graphics. USD represents transformations (also known as “xforms” for short) using the UsdGeomXformable schema. It can encode these kinds of operations as a set of related attributes. Here, we will add a spin rotation on the Z axis, and use time-samples to vary the rotation amount, in degrees:
def AddSpin(top):
spin = top.AddRotateZOp(opSuffix='spin')
spin.Set(time=1, value=0)
spin.Set(time=192, value=1440)
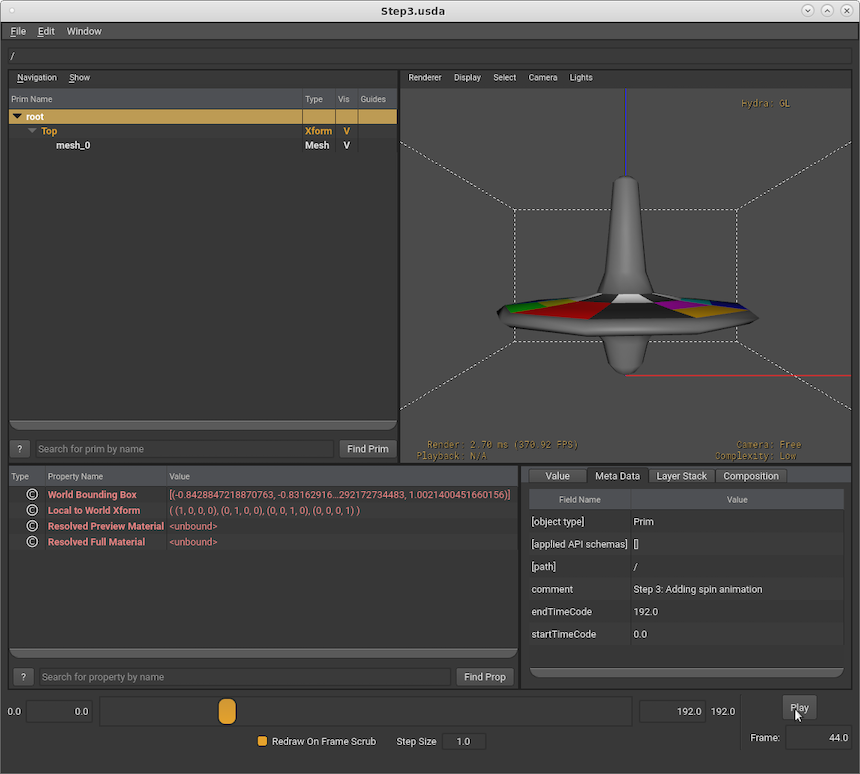
def Step3():
stage = MakeInitialStage('Step3.usda')
stage.SetMetadata('comment', 'Step 3: Adding spin animation')
top = AddReferenceToGeometry(stage, '/Top')
AddSpin(top)
stage.Save()
#usda 1.0
(
    "Step 3: Adding spin animation"
    endTimeCode = 192
    startTimeCode = 1
    upAxis = "Z"
)

def Xform "Top" (
    prepend references = @./top.geom.usd@
)
{
    float xformOp:rotateZ:spin.timeSamples = {
        1: 0,
        192: 1440,
    }
    uniform token[] xformOpOrder = ["xformOp:rotateZ:spin"]
}
UsdGeomXformable uses the name of the attribute to encode its meaning. Here, the rotateZ part specifies a rotation on the Z axis, and spin is a descriptive suffix. There are similar names for related transformation operations; see the UsdGeomXformable schema for details. Even though there is only a single transform at the moment, to make it take effect we must express the desired order as the xformOpOrder attribute.
For time-samples, USD applies a linear interpolation filter to reconstruct the attribute value from the time-samples. Rotations are expressed in degrees, so this provides 4 revolutions over the course of the 192-frame animation.
In usdview, you can use the Play button in the lower right or the scrubber at the bottom of the window to play back the animation.
Switching From Time-samples to Splines
In the previous step we used time-samples to set the animated value(s) for the spin. Time-samples are easy to author, and support linear interpolation, which makes time-samples a good choice for representing animated values that change at a fairly constant rate (e.g. an object moving at a constant velocity).
However, for more complex animations, time-samples may become harder to work with. If we wanted the top to spin slower initially and then speed up, we’d need to add many more time-samples to properly represent this.
Additionally, time-samples can’t be “looped”, meaning we can’t easily represent animations that repeat without duplicating time-samples. In the previous step we set the top to do a full rotation 4 times by setting the rotation value to 1440 degrees. If we wanted a distinct set of 4 rotations, we’d have to set additional time-samples for 360, 720, and 1080 degrees.
Note
USD does provide a way to effectively loop time-samples through value clips, however value clips are more complex to author.
To support more complex, potentially looping animations, USD supports splines. Splines allow for more complex value interpolation across a curve with knots and adjustable tangents, as well as specifying splines or sections of a spline that loop.
Let’s replace the time-samples for the spin with a spline that loops a 360 degree revolution 4 times.
def AddSpinSpline(top):
    spin = top.AddRotateZOp(opSuffix='spin')
    spinAttr = spin.GetAttr()
    typeName = str(spinAttr.GetTypeName())
    spline = Ts.Spline(typeName)
    spline.SetKnot(Ts.Knot(
         typeName = typeName,
         time = 0,
         value = 0,
         nextInterp = Ts.InterpLinear,
         ))
    lp = Ts.LoopParams()
    lp.protoStart = 0
    lp.protoEnd = 48
    lp.numPostLoops = 3
    lp.valueOffset = 360
    spline.SetInnerLoopParams(lp)
    spinAttr.SetSpline(spline)
def Step3A():
    stage = MakeInitialStage('Step3A.usda')
    stage.SetMetadata('comment', 'Step 3A: Using splines instead of timeSamples')
    top = AddReferenceToGeometry(stage, '/Top')
    AddSpinSpline(top)
    stage.Save()
 #usda 1.0
 (
     "Step 3A: Using splines instead of timeSamples"
     endTimeCode = 192
     startTimeCode = 0
     upAxis = "Z"
 )

 def Xform "Top" (
     prepend references = @./top.geom.usd@
 )
 {
     float xformOp:rotateZ:spin.spline = {
         loop: (0, 48, 0, 3, 360),
         0: 0; pre (0, 0); post linear,
     }
     uniform token[] xformOpOrder = ["xformOp:rotateZ:spin"]
 }
Note
In this example we use a loop count of 3 (with a loop value offset of 360) to match the 4 full rotations we produced using timeSamples. However USD also supports spline extrapolation that can be used to extend or repeat a curve to infinity (bounded in a playback tool by the start and end timeCodes specified in the root layer). We’ll revisit this in a later step (Extending Splines with Extrapolation).
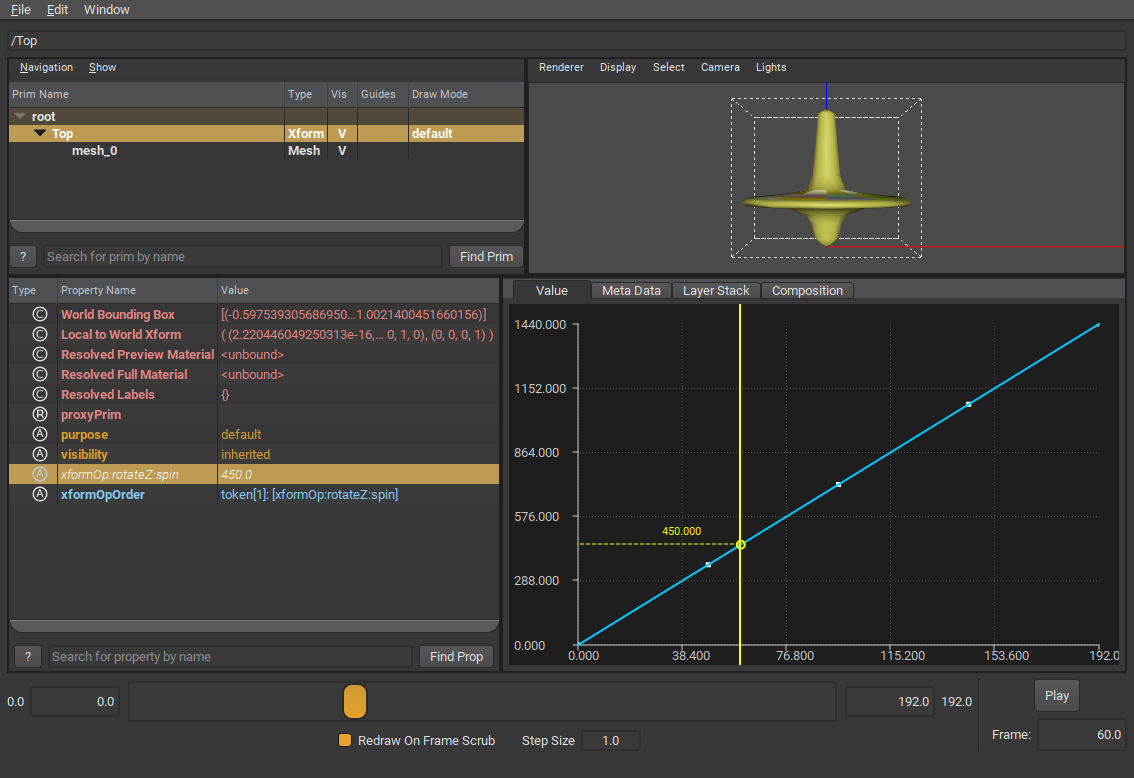
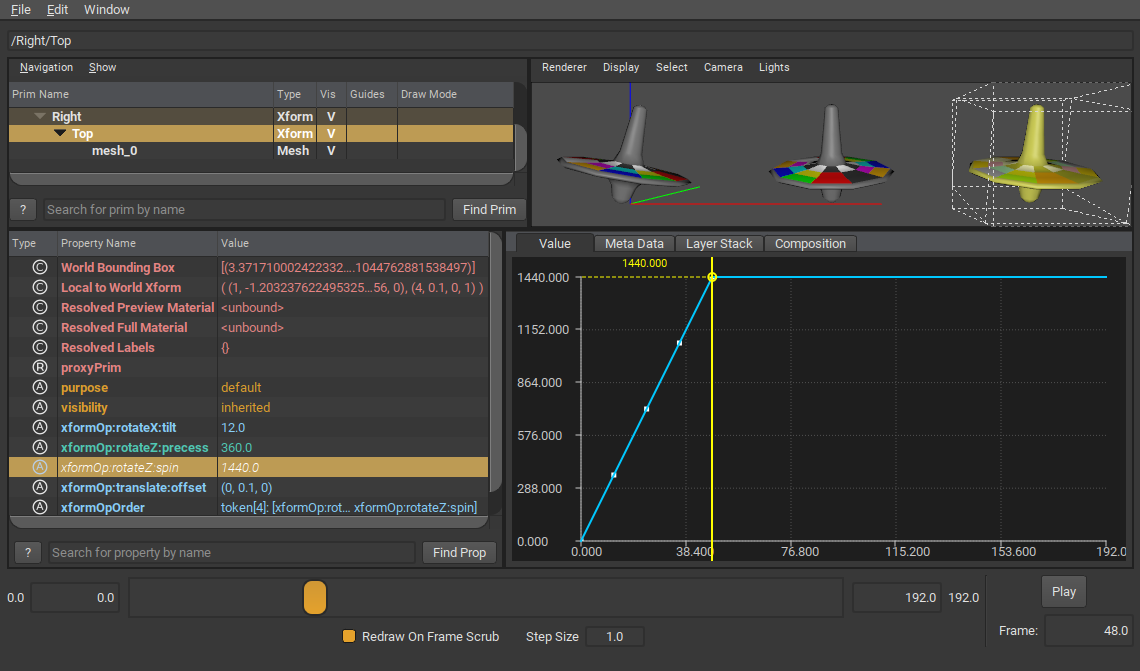
Open Step3A.usda in usdview. You can again use the Play button to preview the animation. You can also view the spin value as a spline by selecting “Top” in the scene tree view, and then selecting the “xformOp:rotateZ:spin” attribute in the property browser. The Value tab in the Metadata/Value view should display the spline. You can also right-click on the attribute and select “View Spline” to see the spline in a separate window.
Chaining Multiple Transformations with xformOpOrder
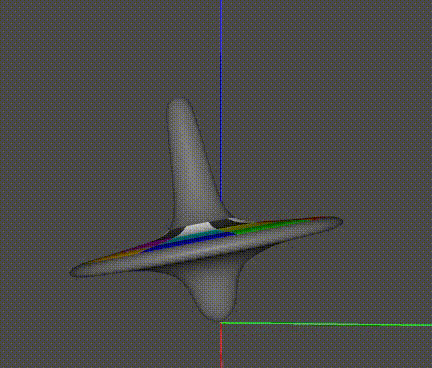
In a real spinning top, gravity causes the top to tilt. Let’s add a “tilt” rotation to represent this. Notice that we add the tilt before the spin:
def AddTilt(top):
    tilt = top.AddRotateXOp(opSuffix='tilt')
    tilt.Set(value=12)

def Step4():
    stage = MakeInitialStage('Step4.usda')
    stage.SetMetadata('comment', 'Step 4: Adding tilt')
    top = AddReferenceToGeometry(stage, '/Top')
    AddTilt(top)
    AddSpinSpline(top)
    stage.Save()
#usda 1.0
(
    "Step 4: Adding tilt"
    endTimeCode = 192
    startTimeCode = 1
    upAxis = "Z"
)

def Xform "Top" (
    prepend references = @./top.geom.usd@
)
{
    float xformOp:rotateX:tilt = 12
    float xformOp:rotateZ:spin.spline = {
        loop: (0, 48, 0, 3, 360),
        0: 0; pre (0, 0); post linear,
    }
    uniform token[] xformOpOrder = ["xformOp:rotateX:tilt", "xformOp:rotateZ:spin"]
}
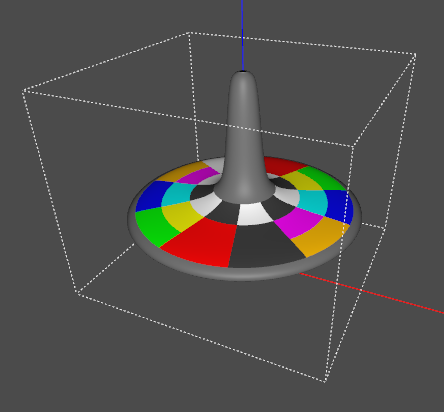
Here is the result. The spin axis is now tilted:
To illustrate the importance of transformation order, here is a variation that shows what we get if we flip the order of rotations, by swapping the two entries in the xformOpOrder:
def Step4A():
    stage = MakeInitialStage('Step4A.usda')
    stage.SetMetadata('comment', 'Step 4A: Adding spin, then tilt')
    top = AddReferenceToGeometry(stage, '/Top')
    AddSpinSpline(top)
    AddTilt(top)
    stage.Save()
...
uniform token[] xformOpOrder = ["xformOp:rotateZ:spin", "xformOp:rotateX:tilt"]
...
Interpreting xformOpOrder
One way to think about xformOpOrder is that it describes a series of transformations to apply relative to the local coordinate frame, in order.
Description |
xformOpOrder |
|
|---|---|---|
First example |
Tilt the top, then spin it on its tilted axis |
[“xformOp:rotateX:tilt”, “xformOp:rotateZ:spin”] |
Second example |
Spin the top, then tilt it in that coordinate frame |
[“xformOp:rotateZ:spin”, “xformOp:rotateX:tilt”] |
This suggests one more detail we’d like to add: precession. Assuming the top is sitting on a surface, torque from gravity will introduce precession, swinging the primary axis of spin around. Friction at the contact point will also cause the top to move slightly on the surface. Restoring the original xformOpOrder, we can model these effects with two more operations:
def AddOffset(top):
    top.AddTranslateOp(opSuffix='offset').Set(value=(0, 0.1, 0))

def AddPrecession(top):
    precess = top.AddRotateZOp(opSuffix='precess')
    precessAttr = precess.GetAttr()
    typeName = str(precessAttr.GetTypeName())
    spline = Ts.Spline(typeName)
    spline.SetKnot(Ts.Knot(
        typeName = typeName,
        time = 0,
        value = 0,
        nextInterp = Ts.InterpLinear,
        ))
    spline.SetKnot(Ts.Knot(
        typeName = typeName,
        time = 192,
        value = 360,
        nextInterp = Ts.InterpLinear,
        ))
    precessAttr.SetSpline(spline)
def Step5():
    stage = MakeInitialStage('Step5.usda')
    stage.SetMetadata('comment', 'Step 5: Adding precession and offset')
    top = AddReferenceToGeometry(stage, '/Top')
    AddPrecession(top)
    AddOffset(top)
    AddTilt(top)
    AddSpinSpline(top)
    stage.Save()
#usda 1.0
(
    "Step 5: Adding precession and offset"
    endTimeCode = 192
    startTimeCode = 1
    upAxis = "Z"
)

def Xform "Top" (
    prepend references = @./top.geom.usd@
)
{
    float xformOp:rotateX:tilt = 12
    float xformOp:rotateZ:precess.spline = {
        0: 0; pre (0, 0); post linear,
        192: 360; post linear,
    }
    float xformOp:rotateZ:spin.spline = {
        loop: (0, 48, 0, 3, 360),
        0: 0; pre (0, 0); post linear,
    }
    double3 xformOp:translate:offset = (0, 0.1, 0)
    uniform token[] xformOpOrder = ["xformOp:rotateZ:precess", "xformOp:translate:offset", "xformOp:rotateX:tilt", "xformOp:rotateZ:spin"]
}
Here is the result:
To summarize: we used splines to animate the motion, and careful ordering of the transformations to express a spinning motion with precession and translation in a relatively simple way. USD uses interpolation to reconstruct the intermediate values of the operations and then computes the combined transformation.
Re-timing animation with Layer Offsets
In the scenes above we referenced the static geometry before adding animation, but it is also possible to reference a file containing its own animation.
While referencing animation, a layer offset can be used to apply a simple scale & offset operation to the timeline.
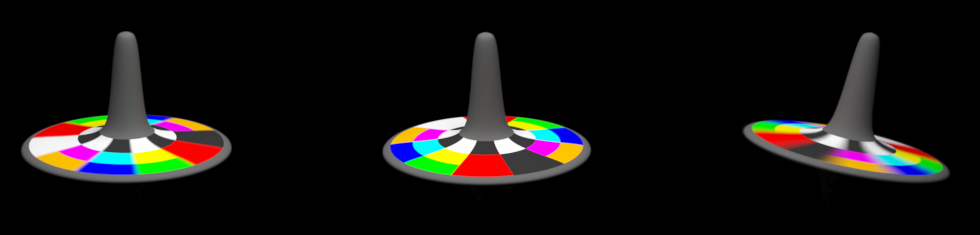
Here we reference the above animation in 3 times, adding a different +X translation to each. The first top has no layer offset; the second has a +96 frame offset (causing it to be 180 degrees out of phase), and the third top has a scale of 0.25 (causing its animation to play back at 4x the rate).
def Step6():
    # Use animated layer from Step5
    anim_layer_path = './Step5.usda'

    stage = MakeInitialStage('Step6.usda')
    stage.SetMetadata('comment', 'Step 6: Layer offsets and animation')

    left = UsdGeom.Xform.Define(stage, '/Left')
    left_top = UsdGeom.Xform.Define(stage, '/Left/Top')
    left_top.GetPrim().GetReferences().AddReference(
        assetPath = anim_layer_path,
        primPath = '/Top')

    middle = UsdGeom.Xform.Define(stage, '/Middle')
    middle.AddTranslateOp().Set(value=(2, 0, 0))
    middle_top = UsdGeom.Xform.Define(stage, '/Middle/Top')
    middle_top.GetPrim().GetReferences().AddReference(
        assetPath = anim_layer_path,
        primPath = '/Top',
        layerOffset = Sdf.LayerOffset(offset=96))

    right = UsdGeom.Xform.Define(stage, '/Right')
    right.AddTranslateOp().Set(value=(4, 0, 0))
    right_top = UsdGeom.Xform.Define(stage, '/Right/Top')
    right_top.GetPrim().GetReferences().AddReference(
        assetPath = anim_layer_path,
        primPath = '/Top',
        layerOffset = Sdf.LayerOffset(scale=0.25))

    stage.Save()
#usda 1.0
(
    "Step 6: Layer offsets and animation"
    endTimeCode = 192
    startTimeCode = 1
    upAxis = "Z"
)

def Xform "Left"
{
    def Xform "Top" (
        prepend references = @./Step5.usda@</Top>
    )
    {
    }
}

def Xform "Middle"
{
    double3 xformOp:translate = (2, 0, 0)
    uniform token[] xformOpOrder = ["xformOp:translate"]

    def Xform "Top" (
        prepend references = @./Step5.usda@</Top> (offset = 96)
    )
    {
    }
}

def Xform "Right"
{
    double3 xformOp:translate = (4, 0, 0)
    uniform token[] xformOpOrder = ["xformOp:translate"]

    def Xform "Top" (
        prepend references = @./Step5.usda@</Top> (scale = 0.25)
    )
    {
    }
}
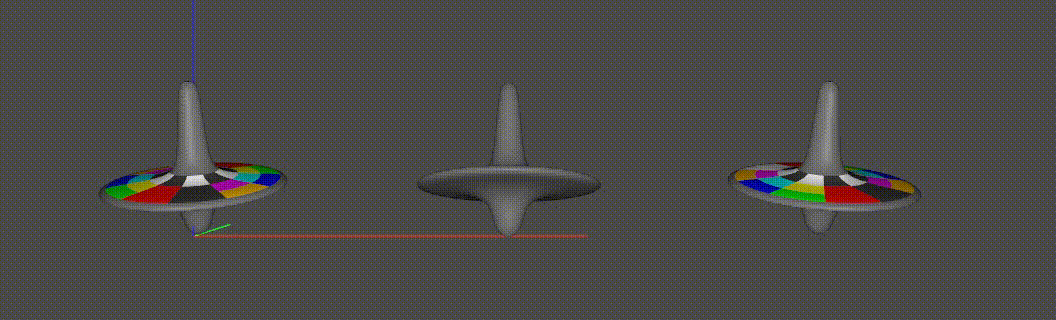
Perhaps it is a surprise that this GIF does not loop cleanly. Let’s look at the reasons. There are several things to observe here that illustrate how time samples and layer offsets work:
A layer offset (represented as SdfLayerOffset) expresses both a scale and offset that is applied to the times of the samples when bringing the data from the layer to the stage. For a given sample, \(stageTime = layerTime * scale + offset\).
The middle top, with the offset of +96, does not begin rotating until 96 frames after the left top (which has no offset). The reason is that we did not specify any spline extrapolation, so outside the time range covered by the spline knots, the nearest sample value is held. In this case, it takes 96 frames until we hit the first knot and rotation begins.
The right top spins quickly (4x the rate) and then stops. The 0.25 scale on its reference has “shrunk down” its timeline, so it quickly plays through. After the first 48 frames (== 192 frames * 0.25), there are no further knots and no post-extrapolation is specified, so again the values are held and rotation stops. If you examine the xformOp:rotateZ:spin attribute spline for /Right/Top in usdview, after 48 frames the spline maintains a “held” constant value equal to the last knot value.
To lay out the tops in a row, we used a parent Xform prim on each, and set the translate there. If we had referenced the Top in directly and added the translate to xformOpOrder, we would be at risk of replacing (or otherwise falling out of sync with) the underlying xformOpOrder and losing its animation. By using a separate pivot we avoid this. It’s worth noting, however, that in a production pipeline most assets do not contain animated root transforms, and so this is not necessary.
When adding the references, we had to specify the primPath. This is because we did not set the defaultPrim metadata when creating Step5.usda; if we had done that, the primPath would not be required.
To summarize, layer offsets are intended to support simple cases of retiming animation. For more elaborate scenarios, USD supports the more powerful (and correspondingly more complex) concept of Value Clips.
Extending Splines with Extrapolation
In the previous step we noted that the tops stop spinning once they reach the final knot. Splines support extrapolation, as mentioned earlier, so we can use this to have the tops spin continuously.
We make a small change to the way we set the spline for the xformOp:rotateZ:spin attribute by setting the post-extrapolation for the spline to Ts.ExtrapLoopRepeat. This extrapolation mode will repeat the entire spline forever, and automatically compute an offset between loops using the difference between the first and last knots.
def AddSpinSplineWithExtrapolation(top):
    spin = top.AddRotateZOp(opSuffix='spin')
    spinAttr = spin.GetAttr()
    typeName = str(spinAttr.GetTypeName())
    spline = Ts.Spline(typeName)
    spline.SetKnot(Ts.Knot(
        typeName = typeName,
        time = 0,
        value = 0,
        nextInterp = Ts.InterpLinear,
        ))
    spline.SetKnot(Ts.Knot(
        typeName = typeName,
        time = 48,
        value = 360,
        nextInterp = Ts.InterpCurve,
        ))
    spline.SetPostExtrapolation(Ts.Extrapolation(Ts.ExtrapLoopRepeat))
    spinAttr.SetSpline(spline)
We make a similar change to the way we set up precession, to ensure this animation also repeats.
def AddPrecessionWithExtrapolation(top):
    precess = top.AddRotateZOp(opSuffix='precess')
    precessAttr = precess.GetAttr()
    typeName = str(precessAttr.GetTypeName())
    spline = Ts.Spline(typeName)
    spline.SetKnot(Ts.Knot(
        typeName = typeName,
        time = 0,
        value = 0,
        nextInterp = Ts.InterpLinear,
        ))
    spline.SetKnot(Ts.Knot(
        typeName = typeName,
        time = 192,
        value = 360,
        nextInterp = Ts.InterpLinear,
        ))
    spline.SetPostExtrapolation(Ts.Extrapolation(Ts.ExtrapLoopRepeat))
    precessAttr.SetSpline(spline)
We then create the animated layer with these new spline configurations, and repeat the code from the previous step that references the animated layer 3 times with different layer offsets.
def Step7():
    # Create animated layer that uses spline extrapolation
    stage = MakeInitialStage('Step7ref.usda')
    stage.SetMetadata('comment', 'Step 7 (ref): Adding spline extrapolation')
    top = AddReferenceToGeometry(stage, '/Top')
    AddPrecessionWithExtrapolation(top)
    AddOffset(top)
    AddTilt(top)
    AddSpinSplineWithExtrapolation(top)
    stage.Save()

    # Use animated layer configured to use spline extrapolation
    anim_layer_path = './Step7ref.usda'

    stage = MakeInitialStage('Step7.usda')
    stage.SetMetadata('comment', 'Step 7: Spline extrapolation')

    left = UsdGeom.Xform.Define(stage, '/Left')
    left_top = UsdGeom.Xform.Define(stage, '/Left/Top')
    left_top.GetPrim().GetReferences().AddReference(
        assetPath = anim_layer_path,
        primPath = '/Top')

    middle = UsdGeom.Xform.Define(stage, '/Middle')
    middle.AddTranslateOp().Set(value=(2, 0, 0))
    middle_top = UsdGeom.Xform.Define(stage, '/Middle/Top')
    middle_top.GetPrim().GetReferences().AddReference(
        assetPath = anim_layer_path,
        primPath = '/Top',
        layerOffset = Sdf.LayerOffset(offset=96))

    right = UsdGeom.Xform.Define(stage, '/Right')
    right.AddTranslateOp().Set(value=(4, 0, 0))
    right_top = UsdGeom.Xform.Define(stage, '/Right/Top')
    right_top.GetPrim().GetReferences().AddReference(
        assetPath = anim_layer_path,
        primPath = '/Top',
        layerOffset = Sdf.LayerOffset(scale=0.25))

    stage.Save()
If you open Step7.usda in usdview and play back the animation, the tops will all continue spinning until the end timeCode for the stage. You can compare this with the animation in Step6.usda to see where the extrapolation takes place. For example, if you examine the xformOp:rotateZ:spin attribute spline for /Right/Top, you’ll notice in Step7.usda that the spline now repeats continuously after timeCode 48, whereas in Step6.usda the spline does not repeat.
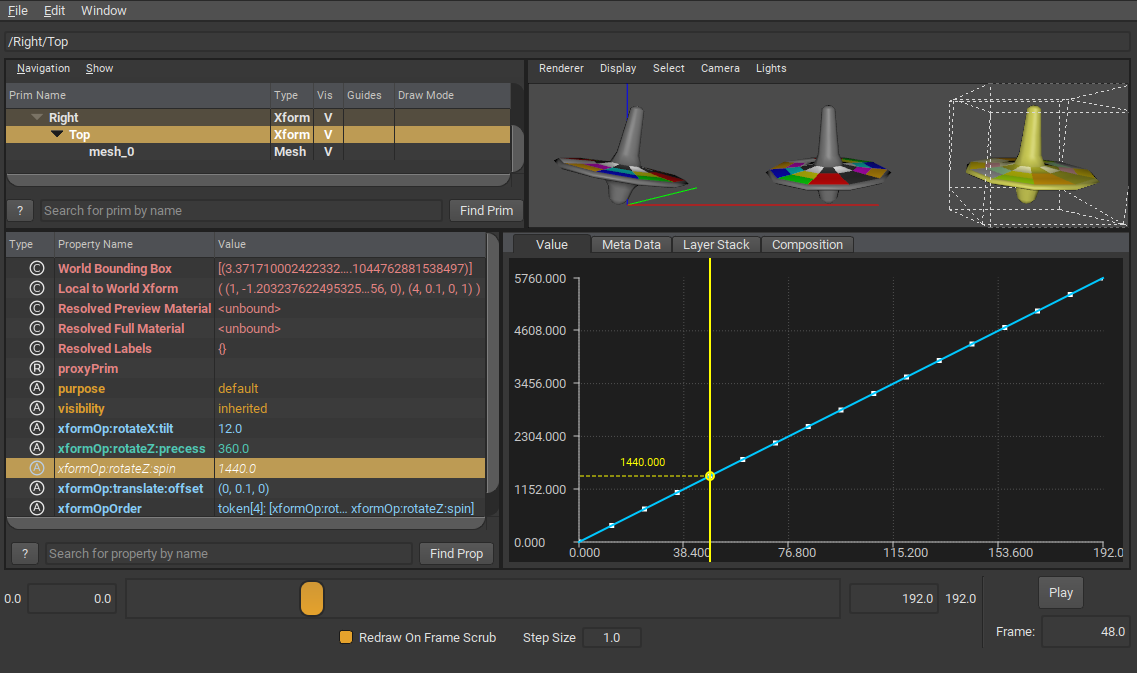
See TsSpline for more details on the different extrapolation modes.
We conclude this tutorial with a path-traced render of the above scene, which illustrates how the varying rates of rotation yield corresponding degrees of motion blur.