Time and Animated Values
OpenUSD supports authoring animated values that do not resolve to a single static value but vary in value over time. This functionality is typically used for describing animations in a USD scene, but can be used for any scenario where time-varying values are needed, such as simulations.
To support animated values, OpenUSD provides features to author animated values, query and interpolate values over time, and work with “clips” of animated data.
Understanding TimeCodes
TimeCodes are the basic time coordinate for USD. By themselves, TimeCodes are unitless, and do not necessarily conceptually map to “frames per second”. TimeCodes also do not represent other industry standard time codes, such as SMPTE. Keeping TimeCodes unitless gives clients flexibility to encode their time-varying data in ways that make the most sense for their application, while at the same time OpenUSD still provides mechanisms for mapping TimeCodes to real time units for decoding and playback, as described in Mapping TimeCodes to Real Time below.
TimeCodes are encoded in USD layers as numeric (double precision) values. The following simple example shows animated attribute values (using TimeSamples) represented as pairs of TimeCodes and values (in this case, float values specifying a translation along the X-axis).
double xformOp:translateX.timeSamples = {
     1: 0,
     25: 10,
     99: 5,
 }
TimeCodes are most commonly used as the time coordinate for animated values, as shown above. However, you can also specify that an attribute or metadata field’s value type is a TimeCode.
def "PrimA"
(
    # custom metadata with timecode value type
    customData = {
        timecode timeCodeMetadata = 24
    }
)
{
    # attribute with timecode value type
    timecode timeCodeAttr = 24
}
When used this way, the attribute or metadata field’s value will be subject to any TimeCode scaling or offsets via composition, as described in Working with Automatic and Explicit TimeCode Remapping Across Composition.
Avoid Using Infinite TimeCodes
When working with TimeCodes, you may encounter situations where you want to use “infinite” time coordinates. For example, you might have an animated attribute where you want to set an arbitrary “earliest” value at time “negative infinity”, so you can adjust the TimeCode later.
While OpenUSD allows authoring and querying using infinite (-inf/inf) TimeCodes, we strongly discourage working with infinite TimeCodes. TimeCodeRanges created with infinite TimeCodes are not considered valid, DCC tools may not be able to represent infinite TimeCodes, and the use of infinite TimeCodes may create future incompatibilities.
Working With TimeCodes Programmatically
OpenUSD provides ways for working with TimeCodes programmatically, for cases where you want to query an animated attribute at a particular TimeCode, or over a TimeCode range. The following example Python code demonstrates using TimeCode APIs to query and author animated values. Note that while you can use double-precision values when querying an animated attribute, we recommend using TimeCodes to ensure future compatibility.
# Given an attribute with animated values, get the value
# at a specific timeCode (which could be interpolated)
workTimeCode = Usd.TimeCode(14)
workValue = translate_attr.Get(workTimeCode)

# Set a new value at a specific timeCode (for this example we assume
# the attribute is using time samples for animated values)
newTimeCode = Usd.TimeCode(24)
translate_attr.Set(2, newTimeCode)
When working with TimeCodes programmatically, there are some situations where the exact numeric value for a TimeCode is not known, or can’t be represented. OpenUSD provides the following features for these situations.
For cases where you are looking for the “earliest” time in a set of TimeCodes, OpenUSD provides UsdTimeCode.EarliestTime(). For example, if you had the following animated values for the xformOp:translateX attribute:
double xformOp:translateX.timeSamples = {
    3: 5,
    25: 10,
    99: 5,
}
The following Python query would get the attribute value at the earliest TimeCode for xformOp:translateX (for this example, the value of 5 at the earliest TimeCode, which is 3).
earliestValue = translate_attr.Get(Usd.TimeCode.EarliestTime())
For cases where you want the value immediately before a given TimeCode, OpenUSD provides UsdTimeCode.PreTime(time). This is useful in situations where an attribute’s value can change discontinuously at a specific TimeCode, for example, when evaluating attributes with “held” interpolation values, or splines with dual-valued knots at the given TimeCode. UsdTimeCode.PreTime(time) will evaluate the limit of an attribute’s animated value as time approaches the given time from the “left”. For example, using the same set of animated values for the xformOp:translateX attribute that we used previously:
double xformOp:translateX.timeSamples = {
    3: 5,
    25: 10,
    99: 5,
}
The following Python query would get the attribute value for the xformOp:translateX attribute just prior to TimeCode 25 (which in this example would be evaluated to 10.0, as the interpolated value is continuous at TimeCode 25).
preValue = translate_attr.Get(Usd.TimeCode.PreTime(25))
OpenUSD has a special “Default” sentinel TimeCode coordinate. The Default TimeCode is used when working with attributes that have default values — “static”, non-time-varying values separate from animated values (if any) for an attribute. In inequality comparisons, the Default TimeCode is considered less than any numeric TimeCode, including EarliestTime(). The following Python example queries the xformOp:translateX attribute for its default value, if any.
defaultValue = translate_attr.Get(Usd.TimeCode.Default())
Mapping TimeCodes to Real Time
TimeCode coordinates for animated values are mapped to real-time seconds by scaling by the layer’s timeCodesPerSecond metadata. The following example sets timeCodesPerSecond to 24.
#usda 1.0
(
    timeCodesPerSecond = 24
)
Assuming the scene used a TimeCode range that started at 0, this would mean a TimeCode of 240 would correspond to 10 seconds of real time.
OpenUSD also provides the legacy framesPerSecond layer metadata, used as an indication of the desired playback rate when the animation is viewed in a playback device (DCC tool, usdview, etc.).
Legacy Behavior of framesPerSecond
framesPerSecond normally does not affect TimeCode scaling and does not combine or interfere with any timeCodesPerSecond value. However, OpenUSD does provide a special legacy behavior where the framesPerSecond value, if set, is used as a fallback value for timeCodesPerSecond if timeCodesPerSecond is not set. The order of precedence OpenUSD uses for determining the timeCodesPerSecond to use is:
timeCodesPerSecond from session layer
timeCodesPerSecond from root layer
framesPerSecond from session layer
framesPerSecond from root layer
fallback value of 24
The general best practice is to use timeCodesPerSecond to specify how TimeCodes are scaled to real time, and framesPerSecond if you need to encode a specific playback rate on playback devices, regardless of how many samples per second are recorded in the USD scene. We provide the information about framesPerSecond as fallback for timeCodesPerSecond primarily as a debugging aid, should you observe unexpected time-scaling. The fallback behavior derives only from USD’s relationship to Pixar’s Presto animation system.
Specifying Layer Start and End Times
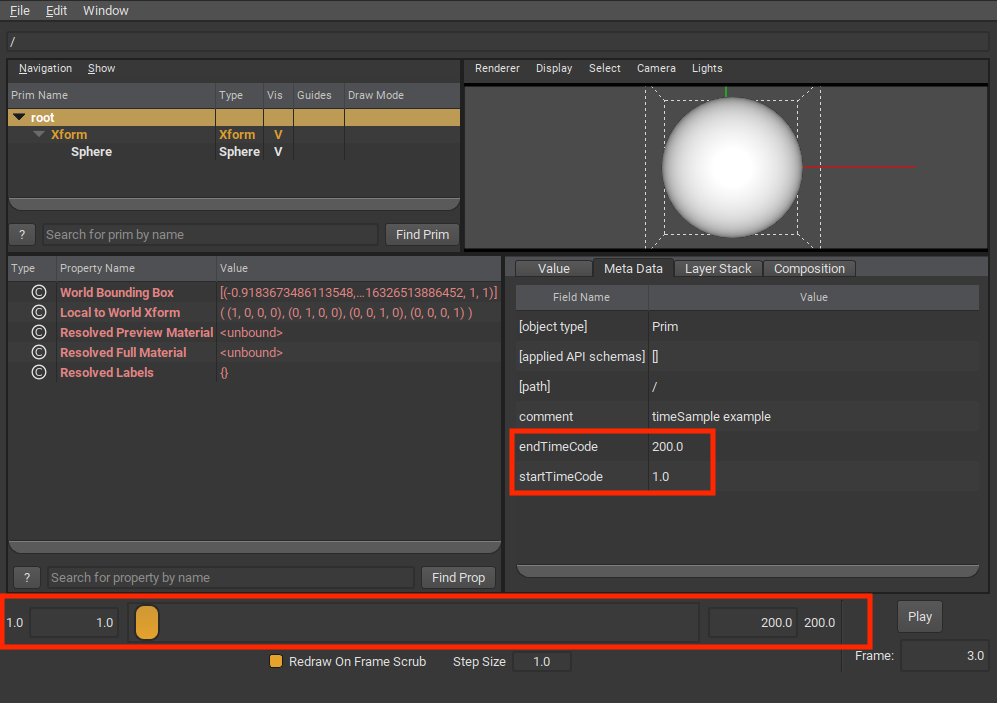
You can specify start and end time codes in a layer using the startTimeCode and endTimeCode layer metadata.
#usda 1.0
(
    startTimeCode = 1
    endTimeCode = 240
)
This TimeCode range is primarily used by clients when determining the initial playback range to expose to users in a tool. For example, usdview uses this range to set the initial range in the playback bar.
startTimeCode and endTimeCode are not used by OpenUSD to set an actual value resolution evaluation range. For example, if you had authored animated values outside the startTimeCode/endTimeCode range, you can still query for those values, or for interpolated values outside the startTimeCode/endTimeCode range.
Using TimeCode Ranges
If you need to programmatically create a closed range of TimeCodes, use UsdUtilsTimeCodeRange. Note that you cannot use TimeCode’s EarliestTime or Default as the start or end TimeCode for the range. You can specify a non-zero stride used for iterating over TimeCodes in the range. The following Python snippet creates a TimeCodeRange using the stage’s start and end TimeCode, with a stride of 2 TimeCodes, to iterate and get an attribute value over that range.
timeCodeRange = UsdUtils.TimeCodeRange(stage.GetStartTimeCode(),
                                       stage.GetEndTimeCode(), 2)
for timeCode in timeCodeRange:
    print(f"At TimeCode {timeCode}, attribute value is: "
          f"{example_attribute.Get(timeCode)}")
Negative stride values are allowed only if the range’s start TimeCode is greater than or equal to the range’s end TimeCode.
Working with Automatic and Explicit TimeCode Remapping Across Composition
When a layer uses composition via sublayering, references, or payloads, OpenUSD can apply a scale and/or offset to the TimeCode coordinates for animated values and the values of any TimeCode-valued attributes and metadata from the target layer. This provides the flexibility to use animated data in your workflow in different scenes with different time frames of reference.
Automatic Scaling of timeCodesPerSecond
If a layer specifies timeCodesPerSecond and is targeted by a sublayer, reference, or payload composition arc, the TimeCode values and animated value coordinates in the targeted layer are automatically scaled to map into the time frame defined by the source layer’s timeCodesPerSecond.
The following example animationA.usda layer specifies a timeCodesPerSecond of 12.
#usda 1.0
(
    timeCodesPerSecond = 12
)
This layer is sublayered into another layer animationRoot.usda that specifies a timeCodesPerSecond of 24.
#usda 1.0
(
    timeCodesPerSecond = 24
    subLayers = [
      @animationA.usda@
    ]
)
With animationRoot.usda as the root layer in a composed stage, any TimeCodes for animated attribute values on prims from animationA.usda would be automatically scaled to animationRoot.usda’s time frame. In this case, the TimeCodes would be scaled by a factor of 2, so that an animated value at TimeCode 12 in animationA.usda (which would map to 1 second in animationA.usda’s timeCodesPerSecond) would have its TimeCode scaled to 24 to match the desired 1 second time mapping in animationRoot.usda’s time scaling. The following diagram shows a couple of TimeCodes in animationA.usda scaled to map to the animationRoot.usda timeCodesPerSecond mapping.

This automatic scaling is applied across the entire LayerStack targeted by the sublayer/reference/payload composition arc. For example, animationA.usda could also sublayer another layer, animationB.usda (not shown) that has its own timeCodesPerSecond of 6.
#usda 1.0
(
    timeCodesPerSecond = 12
    subLayers = [
      @animationB.usda@  # animationB has timeCodesPerSecond = 6
    ]
)
In the composed stage, the TimeCodes for animated values in animationB.usda would be automatically scaled by 2 to fit within animationA.usda’s time frame, and then automatically scaled again by 2 to fit within animationRoot.usda’s time frame.
The automatic scaling is also applied to authored values of attributes or metadata fields of the TimeCode value type. For example, suppose animationA.usda had a prim with an attribute and metadata field of TimeCode value type.
#usda 1.0
(
    timeCodesPerSecond = 12
)

def "PrimA"
(
    # metadata with timecode value type
    customData = {
        timecode timeCodeMetadata = 10
    }
)
{
    # attribute with timecode value type
    timecode timeCodeAttr = 15
}
If this layer were sublayered into animationRoot.usda with a timeCodesPerSecond of 24, the metadata field and attribute values would be automatically scaled in the flattened results.
#usda 1.0
(
    timeCodesPerSecond = 24
)

def "PrimA" (
    customData = {
        timecode timeCodeMetadata = 20
    }
)
{
    timecode timeCodeAttr = 30
}
Note there is no automatic application of a layer’s startTimeCode or endTimeCode as offsets for TimeCode coordinates in a composed stage. There is a way to manually specify an offset, discussed in the next section.
Configuring TimeCode Scaling and Offsets Using LayerOffsets
If you need to scale or shift the TimeCodes in a sublayer or referenced or payloaded layer, you can do so by adding a “LayerOffset” to the composition arc. For example, you might have character animation that you want to re-use for a different background character, but it needs to be re-timed for the current scene.
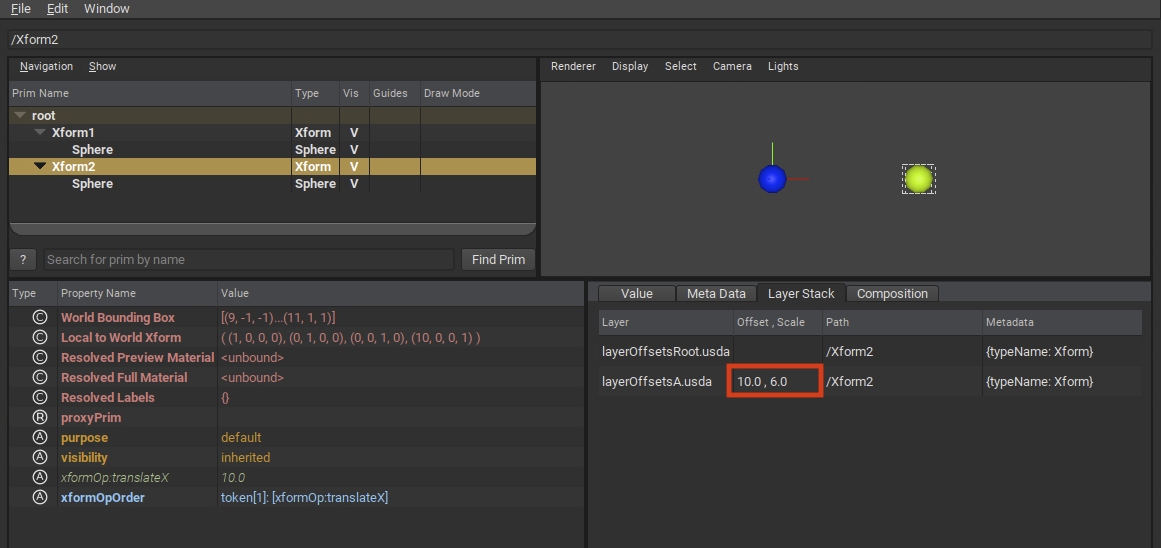
The following layerOffsetsRoot.usda layer specifies a LayerOffset with an offset of 10 and a scale of 2 for a sublayer composition.
#usda 1.0
(
    timeCodesPerSecond = 24
    subLayers = [
      @layerOffsetsA.usda@ (offset = 10; scale = 2)
    ]
)
In the composed stage, TimeCodes for animated values in layerOffsetsA.usda will be scaled and offset accordingly. Note that when mapping from a layer’s time frame to that of the layer that references or sublayers it, OpenUSD will apply scaling first, and then the offset, if both are specified.
In the above example, an animated value at TimeCode 10 in layerOffsetsA.usda will have its TimeCode scaled to 20, and then offset by 10 to 30, in the composed stage. The following diagram shows TimeCodes from layerOffsetsA.usda being scaled by 2 and then offset by 10 in a composed stage.

LayerOffsets can be specified for references and payloads in a similar way. The following example applies a scale and offset to the TimeCodes for any animated attributes of a referenced Prim.
def Xform "Xform2"
(
    prepend references = @animationA.usda@</Xform2> (offset = 10; scale = 2)
)
{
}
As mentioned in Understanding TimeCodes, TimeCodes can be used as an attribute or metadata field’s value type. LayerOffsets will scale and offset authored TimeCode values just like TimeCode coordinates. For example, assume you had the following timeCodeValues.usda layer.
def "PrimA"
(
    # custom metadata with timecode value type
    customData = {
        timecode timeCodeMetadata = 10
    }
)
{
    # attribute with timecode value type
    timecode timeCodeAttr = 15
}
This layer is then sublayered into timeCodeValuesRoot.usda with a LayerOffset scale and offset.
#usda 1.0
(
    startTimeCode = 1
    endTimeCode = 240
    timeCodesPerSecond = 24
    subLayers = [
      @timeCodeValues.usda@ (offset = 10; scale = 2)
    ]
)
If timeCodeValuesRoot.usda is loaded into a stage and flattened, the result will have the LayerOffset applied to the TimeCode attribute and metadata field values from PrimA.
def "PrimA" (
    customData = {
        timecode timeCodeMetadata = 30
    }
)
{
    timecode timeCodeAttr = 40
}
Keep in mind the following requirements for LayerOffsets.
Scale cannot be 0. This will cause a composition error and the LayerOffset will be ignored.
Scale also cannot be negative (this will also cause a composition error and be ignored), as this could cause incorrect resolution of animated values. If you want to reverse the time order of TimeCodes, consider using the Value Clips feature.
Offset can be negative, which results in the TimeCodes being offset “earlier” in the composed stage.
A LayerOffset itself cannot be animated. You can’t change the specified offset or scale over time. If you need this behavior, the Value Clips feature can provide this.
In usdview, you can see the LayerOffset for a given layer stack via the “Layer Stack” tab.
Combining Automatic Scaling and Layer Offsets
If you apply a LayerOffset to a target layer, and the target layer has a timeCodesPerSecond that differs from that of the referencing layer, OpenUSD applies both the automatic source/target layer scaling and the LayerOffset scale (in that order) to TimeCodes in the composed stage. For example, assume you have the following animationLayer.usda layer.
#usda 1.0
(
    timeCodesPerSecond = 8
)
If you then sublayered this layer in the root layer of your stage, using a Layer Offset with a scale of 2:
#usda 1.0
(
    timeCodesPerSecond = 24
    subLayers = [
      @animationLayer.usda@ (offset = 10; scale = 2)
    ]
)
TimeCodes for animated values in animationLayer.usda would be adjusted as follows. First, the automatic scaling would adjust TimeCodes by a factor of 3 (from the animationRootLayer’s timeCodesPerSecond value of 24 divided by animationLayer’s timeCodesPerSecond value of 8). Then, the adjusted TimeCodes would be adjusted further by a factor of 2 (from the subLayer LayerOffset scale) and offset by 10. For example, a TimeCode coordinate of 10 in animationLayer.usda would be multiplied by 3, then multiplied by 2, and finally offset by 10, resulting in a TimeCode coordinate of 70 in the composed stage.
Animating Attribute Values
To animate an attribute value, author the value using a value source that varies the value over time. Currently, OpenUSD provides the following time-varying value sources:
TimeSamples: A list of (TimeCode, value) pairs that define an attribute’s value at specific points in time. OpenUSD uses linear or held interpolation, depending on the value type, to interpolate values between TimeSamples. Use TimeSamples when working with discrete animation data, such as simulation outputs or motion-capture data. TimeSamples are the best choice when maximum interoperability is a priority, and are widely supported across DCC tools and renderers.
Splines: A curve that specifies how a scalar floating point value varies over time. A spline is primarily defined by its collection of knots and the curve segments between them. OpenUSD supports several different curve/interpolation types, as well as features like looping and extrapolation. Use Splines when you need precise control over animation curve shape and timing. Splines are also a good choice when data size is a concern, as complex curves can be represented with a small set of knots.
Value Clips: Groups of time-varying values (TimeSamples or Splines) that are partitioned into multiple clip layers, and then sequenced and optionally retimed on multiple models. Use Value Clips when working with large sets of animated data from multiple sources. Value Clips are particularly useful when working with crowd animations where you can apply the same sets of animations to multiple background characters, re-sequenced and/or re-timed as necessary, to create a large variety of animations from a base set of clips. Value Clips are also useful for working with very large simulation datasets, where it is desirable to put each simulation step’s output into a different file/asset.
Each of these is described in more detail in sections below. For a step-by-step tutorial that uses TimeSamples and Splines, see Transformations, Animation, and Layer Offsets.
Providing a Default Value
OpenUSD provides a way to author a “default” value for an attribute, that acts as a “static”, non-time-varying value. This can be authored in addition to an animated value, or authored as the single static value for attributes where you don’t need to (or want to) author animated values. Some examples where you might author a default value include placing static objects in a scene, or composing layers with existing animated assets where you want to use their static pose in your stage (you would also use an animation block to ignore any animated values in this example).
The following example has both a default value and an animated value (using TimeSamples) authored for the attr attribute.
def "PrimRef"
{
    double attr = 100  # Default value for attr
    double attr.timeSamples = {
        1: 100,
        24: 500,
    }
}
OpenUSD uses value resolution rules to determine when to return the Default value when the attribute is queried, versus returning an animated value. As mentioned previously, other OpenUSD features, such as animation blocks can also govern when Default values are used.
Programmatically you can use the unique TimeCode UsdTimeCode::Default() when authoring or querying default values, as described in Working With TimeCodes Programmatically above.
Note
Default values should not be confused with Fallback values, which are values set in schema definitions for an attribute that will automatically be used if nothing is authored for that schema attribute.
Understanding Value Resolution
When authoring or querying animated values, it’s important to understand how OpenUSD resolves all the value sources for an attribute locally and across the layer stack.
Note
While metadata values also have a specific process for resolving multiple opinions from different sites, that process is not discussed here, as metadata values cannot be animated. See Value Resolution for more details on metadata value resolution.
Part of attribute value resolution involves resolving all the propertySpecs for the attribute across any composition arcs for the prims that contain the property. Animation workflows commonly use composition to coordinate animation data. For example, a character rigging department might create a “base pose” layer for a character rig with the character joint orientation attribute default values authored to fit the “base pose” of the rig. An animation department might sublayer the base pose layer and then author stronger opinions for the joint orientation attributes using animated values. When composing the animation layer, OpenUSD will properly apply the animated values to the rig.
Attribute value resolution differs from prim-level composition in some ways (as described in Value Resolution), and additionally, attributes in a propertyStack can have multiple value sources authored at the local site. There are four possible sources for an attribute value, listed as follows in strong-to-weak order:
TimeSamples
Splines
Default Value
Value Clips
For attributes that are defined in a schema, there is a potential fifth source, which is the fallback value for the attribute specified by the schema. The fallback value will be used if no other value sources have been authored.
The following example shows a Sphere’s radius attribute with opinions for all four possible value sources (and indirectly the fifth, as the Sphere schema provides a fallback for the radius attribute).
def Sphere "SphereA"
(
    # A clip set for this prim, that points to clip data and clip
    # manifest information (omitted for brevity) that contains
    # time varying values for radius.
    clips = {
        dictionary default = {
            asset[] assetPaths = [@./satav_clip1.usda@]
            asset manifestAssetPath = @./satav_manifest.usda@
            double2[] active = [(1,0)]
            string primPath = "/Clip"
            double2[] times = [(1,1), (30, 30)]
        }
    }
)
{
    double radius = 7.0
    double radius.timeSamples = {
        1: 1.0,
        30: 3.0
    }
    double radius.spline = {
        bezier,
        1: 10; pre (0, 0); post curve (0, 0),
        30: 30; pre (0, 0); post curve (0, 0),
    }
}
When an attribute is queried for a value, OpenUSD will use the following value resolution process, depending on whether the query was for a particular TimeCode (with OpenUSD taking into account any TimeCode layer scaling or offset), or for the Default Value (by querying explicitly with UsdTimeCode::Default() or using a query method without providing any TimeCode).

Note
You can’t “compose” partial animated values, or “sparsely” override animated values. For example, if you had two prims, PrimRef1 and PrimRef2, both with animated values for a property at different TimeCode ranges, using references that compose both prims will not result in combining animated values from both prims.
def "PrimRef1"
{
    float floatAttr.timeSamples = {
        1: 2,
        30: 20,
    }
}

def "PrimRef2"
{
    float floatAttr.timeSamples = {
        40: 5,
        70: 7,
    }
}

def "NewPrim"
(
    # We'll only get floatAttr opinions from PrimRef1
    prepend references = [</PrimRef1>, </PrimRef2>]
)
{
}
If you need to combine opinions for animated values for a property from multiple sources, consider using value clips where each source can come from a separate “clip” layer.
Blocking Animated Values From Weaker Opinions
As mentioned previously, a composed Prim’s attributes may have animated values contributed from composition arcs. However, there may be scenarios where you want the composed model in your scene, but you explicitly do not want certain associated animated values, and want to avoid destructively editing the “source” layers that contain the animated values. For these situations, OpenUSD provides attribute blocks and animation blocks.
Blocking All Values (Attribute Blocks)
A full value block (also known as an attribute block) can be used to block all values (including Default values) contributed from weaker opinions for an attribute. In the following example, SphereBlockValue references SphereRef, which contains animated and default values for the radius attribute. SphereBlockValue also has an attribute block authored on SphereBlockValue.radius. Queries for the value of SphereBlockValue.radius will return 1.0 (the schema fallback value), and the referenced TimeSample values and Default value will not contribute to SphereBlockValue.radius.
def Sphere "SphereRef"
{
    double radius = 10
    double radius.timeSamples = {
        1: 1,
        10: 3,
        20: 5
    }
}

def Sphere "SphereBlockValue" (
    references = </SphereRef>
)
{
    # Block all weaker opinions, including any default values
    # Fallback for radius will come through, however.
    double radius = None
}
In this example the schema fallback value is returned for a query at any time value, because the attribute block is expressing the intent to treat the attribute as having no authored value. This can result in schema fallback values (if any) being accessible.
To programmatically author an attribute block, you can use UsdAttribute.Block().
# Block the entire attribute
attr.Block()
Using Value Blocks in Animated Values
You can author a value block on an individual TimeSample or Spline knot, but the behavior (and intent) is different from an attribute block applied to an attribute. A value block is an explicit authored opinion for a specific time or curve segment. OpenUSD treats the attribute as having an authored opinion at that time, so the attribute at that time will evaluate to None, regardless of whether the attribute has a schema fallback.
For TimeSamples, a value block marks that the attribute has no value over a specific time range:
def Sphere "BigBall"
{
    double radius.timeSamples = {
        101: 12,
        110: None,
        120: 14
    }
}
Queries for radius at time codes [110, 120) return no value. Unlike an attribute block, the schema fallback for radius is not returned; the None time sample covering that range causes the Attribute to report that it cannot resolve any value for that range.
Note
Per-TimeSample attribute blocks can’t be used to sparsely override TimeSamples, just as TimeSamples can’t be sparsely overridden in general. If you have TimeSamples for an attribute at times 1 and 24, and then reference this into another prim that has a None value at time 1, getting the value for the attribute on this same prim at time 24 will evaluate to None, and not the reference target’s attribute TimeSample value at time 24.
To programmatically author a value block for a specific TimeSample, you can use UsdAttribute.Set(SdfValueBlock, TimeCode).
# Block at a specific TimeCode (for a TimeSample)
attribute2.Set(Sdf.ValueBlock(), Usd.TimeCode(40))
For Splines you can block individual curve segments to block opinions for that segment. The following example specifies that the curve segment from the knot at TimeCode 20 to the knot at TimeCode 30 is blocked.
def "SplineRef"
{
    double splineAttr.spline = {
        bezier,
        1: 10; pre (0, 0); post curve (5, 0.0125),
        20: 20; pre (0, 0); post none,
        30: 10; post curve (0, 0),
    }
}
Note
Setting an attribute to an empty spline (a spline with no knots) behaves similarly to a value block segment in a Spline. Because no knot opinions are authored, querying for a value returns no value (not the schema fallback if any), however the attribute itself is considered authored with a (empty) Spline. Don’t set an attribute to an empty spline if your intent is to block all values for an attribute and make the attribute appear “unauthored”; use an explicit attribute block instead.
Using Animation Blocks
Animation blocks are similar to attribute blocks, however they only block animated values but not default values. Use an animation block when you want to block animated values from weaker opinions in your scene, but you still want the default value from weaker layers to come through. A use case for animation blocks might be where an animation team has composed sublayers that were originally authored by a different department with scratch animation data. The animation team wants to use the layers as if no animated values were authored, but they want to start with the same default values that were already authored in establishing layers.
In the following example, an animation block is authored on PrimA.attr. Queries for the value of PrimA.attr will return 100 (the Default value from PrimRef.attr). If PrimRef.attr did not have an authored Default value, queries for PrimA.attr would return None, similar to the behavior if PrimA.attr used an attribute block.
def "PrimRef"
{
    double attr = 100  # Default value for attr
    double attr.spline = {
        bezier,
        1: 10; pre (0, 0); post curve (5, 0.0125),
        20: 20; pre (0, 0); post curve (0, 0),
    }
}

def "PrimA" (
    references = </PrimRef>
)
{
    double attr = AnimationBlock
}
Animation blocks cannot be used on individual TimeSamples or Spline curve segments. You can only use animation blocks on the entire attribute value. Animation blocks also cannot be used in Value Clips.
To programmatically author an animation block, use UsdAttribute.BlockAnimation().
# Set an animation block on attribute1
attribute1.BlockAnimation()
Using TimeSamples
TimeSamples represent a sparse mapping from TimeCode coordinates to attribute values. TimeSamples provide a way to author a finite list of (time, value) pairs that define how an attribute changes over time, with OpenUSD responsible for filling in the gaps by interpolating values for TimeCodes between (and outside of) defined values.
TimeSamples are useful for animating with values that work with linear interpolation (generally numeric values). TimeSamples can also be used for animating non-interpolatable values (bools, strings/tokens) where the attribute value needs to change at certain times, but otherwise is held at the last authored TimeSample value. Note that TimeSamples are the only option with OpenUSD for animating non-scalar tuples (normals, matrices, etc.) and arrays of scalar numbers.
For situations where animation complexity and/or precision end up requiring a large amount of TimeSamples, consider using Using Splines instead. For situations that require “higher-level” animation features such as looping, or easier editability, consider using Splines or Value Clips.
TimeSamples are represented as a list of TimeCode/value pairs that map TimeCode coordinates to values of an attribute’s type. The following example has TimeSamples for two attributes on PrimA: floatAttr and boolAttr.
#usda 1.0
(
    startTimeCode = 1
    endTimeCode = 100
)

def "PrimA"
{
    float floatAttr.timeSamples = {
        2: 5,
        7: 7,
        15: 25
    }

    bool boolAttr.timeSamples = {
        2: True,
        10: False,
        20: True
    }
}
The following diagrams help visualize the interpolations and extrapolations that OpenUSD uses with TimeSamples. “TimeSamples for float attribute” shows the linear interpolation (and held extrapolation) for floatAttr over a TimeCode range, and “TimeSamples for bool attribute” shows the held interpolation for boolAttr.

For value types that are interpolatable, such as for floatAttr in the above example, OpenUSD will use linear interpolation to determine values at TimeCodes between the set of authored TimeSamples. For example, if you query for the value of floatAttr at TimeCode 10, you’ll get the interpolated value 13.75 (we assume for this example that the layer has no TimeCode remapping applied).
prim = stage.GetPrimAtPath("/PrimA")
floatAttr = prim.GetAttribute("floatAttr")
val = floatAttr.Get(Usd.TimeCode(10))  # returns interpolated value
Note that linear (element-wise) interpolation extends to arrays of interpolatable types as well, provided the bracketing samples are arrays of the same length. In the following example, the interpolated value for arrayAttr at time 5 will be [(9.444445, 0, 0), (0.8888889, 5.4444447, 0)].
def "PrimA"
{
    # USD will do element-wise interpolation provided all the arrays are
    # the same length.
    float3[] arrayAttr.timeSamples = {
        1: [ (5.0, 0.0, 0.0), (0.0, 5.0, 0.0) ],
        10: [ (15.0, 0.0, 0.0), (2.0, 6.0, 0.0) ],
        20: [ (25.0, 0.0, 0.0), (5.0, 7.0, 0.0) ]
    }
}
For value types that are not interpolatable, such as for boolAttr in the previous example, OpenUSD will use “held” interpolation, where the value for a given TimeCode will be “held” for all TimeCode coordinates until the next authored TimeSample (if any). In the previous example if you query for the value of boolAttr at TimeCode 15 you’ll get the value False, held from the value authored for TimeCode 10.
prim = stage.GetPrimAtPath("/PrimA")
boolAttr = prim.GetAttribute("boolAttr")
val = boolAttr.Get(Usd.TimeCode(15))  # returns held value
Additionally, as bool is not interpolatable, getting the value at the Usd.TimeCode.PreTime() for an authored TimeSample will return the held value (if any) up until that TimeCode. For example, Get(Usd.TimeCode.PreTime(10)) will return True (held from TimeCode 1).
val = boolAttr.Get(Usd.TimeCode.PreTime(10))
When querying for values “outside” the authored range of TimeCodes, OpenUSD will extrapolate held values of the nearest TimeSample. If we query floatAttr at TimeCode 1, which is earlier in time than the earliest TimeSample (at TimeCode 2), we get the extrapolated held value from the TimeSample at TimeCode 2.
# returns extrapolated value from TimeSample at TimeCode coordinate 2
val = floatAttr.Get(Usd.TimeCode(1))
Additional things to be aware of when working with TimeSamples:
TimeSample TimeCodes can be scaled and offset by layer offsets, or scaled by automatic layer time scaling.
You can use value blocks to block individual TimeSamples.
Using Splines
Splines represent curves that define how a scalar floating point value varies over time. Mathematically, a spline is a piecewise curve made up of knots and the curve segments between them.
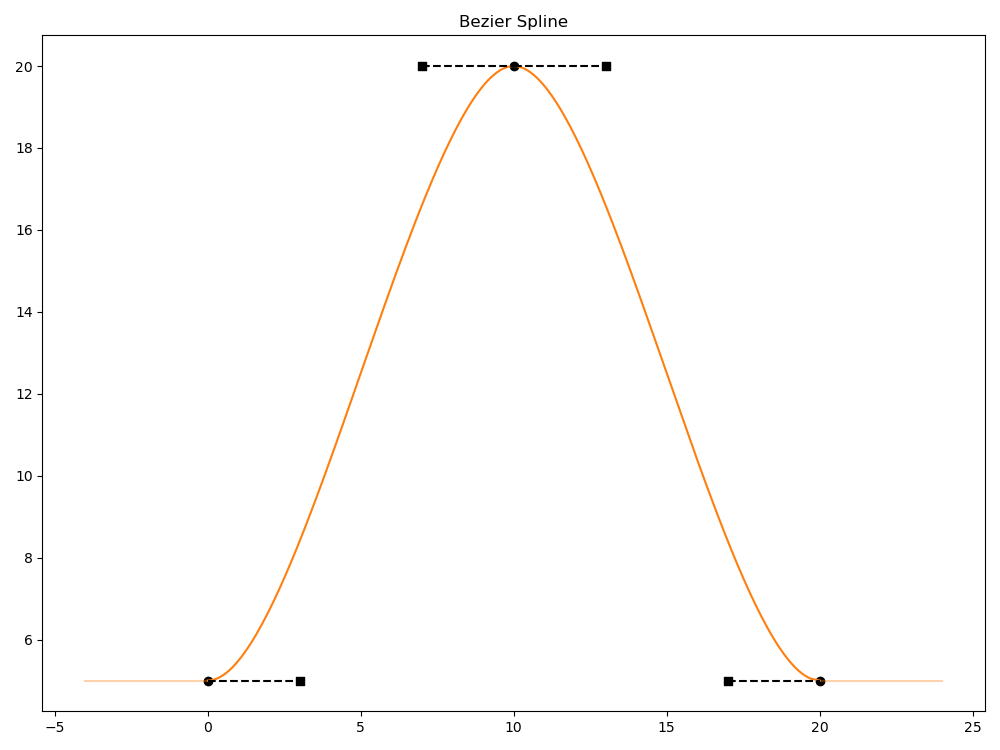
Splines provide higher order controls for animation than TimeSamples. If you’re authoring animations where you need smooth control over animation timing or more gradual (or sharper) “ease-in” and “ease-out” of your animation, Splines are easier to author and use less data than TimeSamples. In the following graphs, “Bezier Spline” shows a spline with 3 knots. “Sampled Spline” shows an approximation of the same spline using 20 TimeSamples and linear interpolation. Notice how the sampled version uses more data and loses some of the curve shape near times 0, 10, and 20.

Splines also provide additional features, such as inner looping (automatic repeating of parts of the spline) and extrapolation modes including looping. You can also use value blocks to indicate that a particular segment has no values.
OpenUSD’s spline interpolation features are compatible with the AnimX Library, and Splines will be most interoperable with engines and DCC tools that use the same interpolation implementation. However, at the time OpenUSD Splines were implemented, some features were included that were not available in some DCC Tools at the time, such as dual-value knots, inner loops, and support for Value Clips. For scenarios where your engine or tool uses AnimX but does not support these additional features, OpenUSD provides ways to “bake out” spline data to an AnimX-compatible form. For scenarios where your engine or tool can’t use AnimX or can’t support splines, consider baking splines to TimeSamples when transferring data to your engine/tool. Splines are also only supported for floating-point scalar value types, and all knots in a spline must have the same value type. If you need to have animated values for non-floating-point value types, use Using TimeSamples.
In OpenUSD, a spline is primarily defined by its collection of knots. Each knot has a time and a value (and an optional pre-value) and information about how to interpolate the value over the segments between it and its neighboring knots. The following example shows a Prim whose attr attribute has an authored spline with 3 knots at times 0, 10, and 20.
def "Prim" {
    float attr.spline = {
         bezier,
         0: 5; pre (0, 0); post curve (3, 0),
         10: 20; pre (3, 0); post curve (3, 0),
         20: 5; pre (3, 0); post curve (0, 0),
    }
}
Working with Basic Spline Information
The OpenUSD spline type, Ts.Spline, contains value type and curve type information, along with a list of knots. Splines can also optionally contain inner loop and outer extrapolation information, described in Looping and Extrapolation below.
Splines can only use scalar value types (float, double, half). All knots in a Spline are expected to use the Spline’s value type for the knot value. Splines can also be used with “time valued” attributes, where the attribute type is timecode.
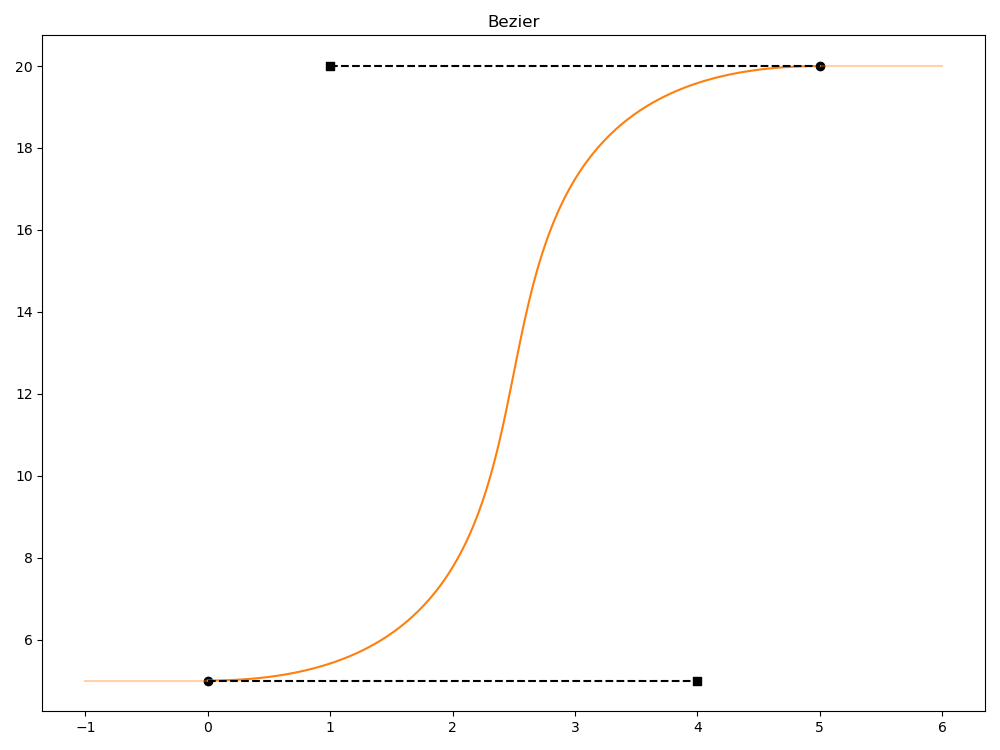
Splines can specify the curve type used for all “curve interpolation” segments in the Spline. The curve type can be Bezier (the default) or Hermite. Bezier curves have freely adjustable knot tangent widths, and provide the most control over the curve shape. The following Bezier curve uses tangent widths of 4, resulting in a more gradual “ease-in/out” period for the curve segment.
def "PrimWithBezier"
{
    double attr.spline = {
        bezier,
        0: 5; pre (0, 0); post curve (4, 0),
        5: 20; pre (4, 0); post curve (0, 0),
    }
}
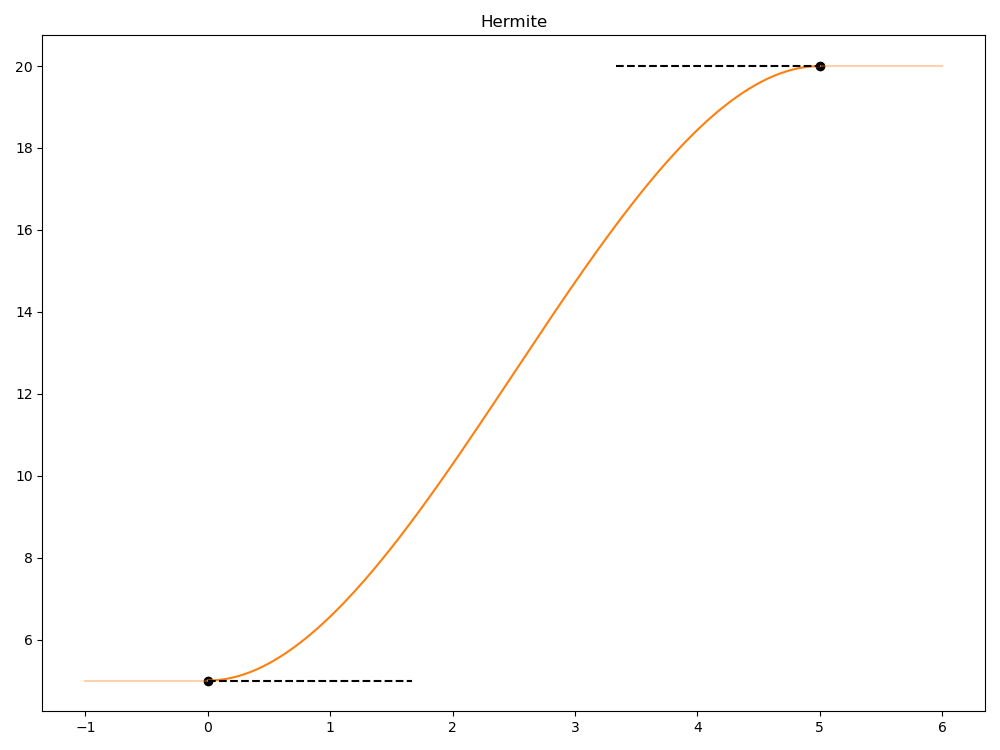
Hermite curves automatically set the tangent widths to one third of the segment span. Any explicit tangent width set is ignored (but tangent slope is not ignored). Hermite curves provide less control over the curve shape, but generally ensure a smoother, more predictable curve. The following Hermite curve segment has the tangent widths automatically set to one third of the given 5 unit span.
def "PrimWithHermite"
{
    double attr.spline = {
        hermite,
        0: 5; pre (0); post curve (0),
        5: 20; pre (0); post curve (0),
    }
}
Working with Knots
A Knot (Ts.Knot) is a control point on the spline. Each Knot can have the following information.
Time: The time for the knot. Note that these times can be scaled and offset by layer offsets, or scaled by automatic layer time scaling.
Value: The scalar value for the knot. The value type used (double, float, half) should match the value type set for the Spline the knot will be. As noted earlier, splines can also be used with “time valued” attributes, where the attribute type is timecode. In these scenarios, the Knot value and the Knot time will both be affected by layer offsets and automatic layer time scaling.
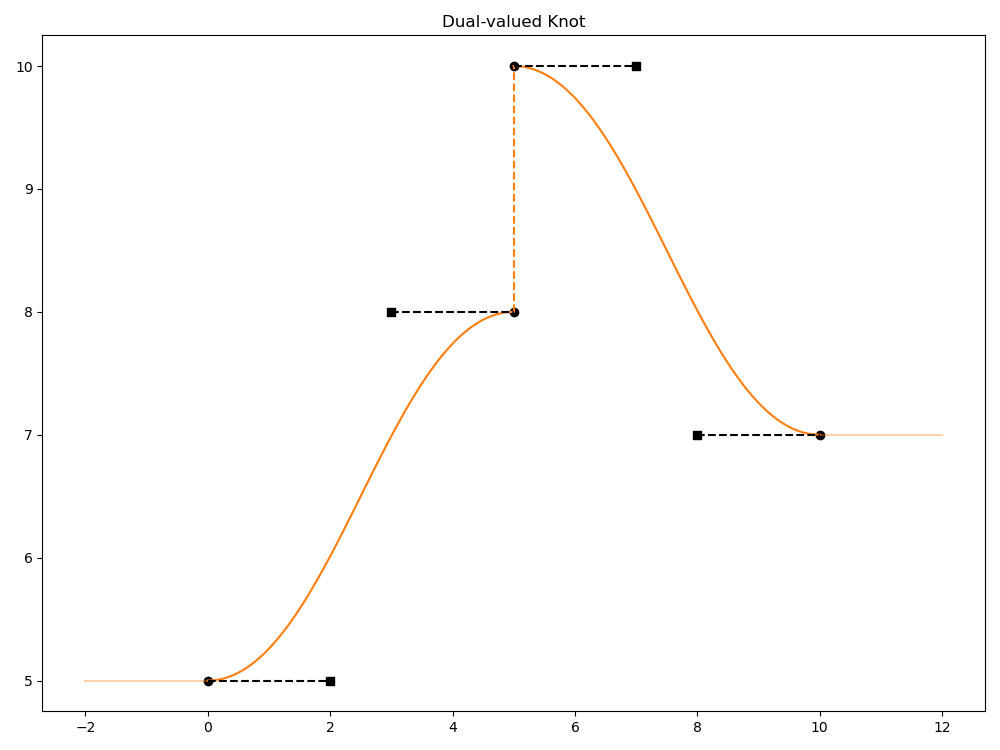
PreValue: An optional additional value for the knot that represents the value for the knot when evaluated “from the left” (earlier in time). This creates a value discontinuity at the knot time coordinate, and a knot that has an authored prevalue is considered a dual-valued knot.
The following example sets a pre-value of 8 for the knot at time 5, which results in that knot being dual-valued (“8 & 10”) and having a value discontinuity.
def "Prim"
{
    double attr.spline = {
        bezier,
        0: 5; pre (0, 0); post curve (2, 0),
        5: 8 & 10; pre (2, 0); post curve (2, 0),
        10: 7; pre (2, 0); post curve (0, 0),
    }
}
If a dual-valued knot follows a curve segment using held or ValueBlock interpolation (see “Next interpolation mode”), the pre-value is ignored. This avoids creating a situation where the pre-value is effective at only the immediate “left” of a single knot.
Note
Dual-valued knots may not be supported in some DCC tools and engines. Depending on your use-case, you might be able to create similar discontinuities by using two adjacent knots.
Next interpolation mode: The interpolation mode used for the curve segment from this knot to the next knot. The interpolation mode can be one of the following:
Curve (Ts.InterpCurve): Use the Spline’s curve type (Bezier or Hermite) to do curve-based interpolation for the curve segment.
Held (Ts.InterpHeld): Hold the knot’s value for the duration of the curve segment. This is the default interpolation mode.
Linear (Ts.InterpLinear): Use linear interpolation for the curve segment.
Value block (Ts.InterpValueBlock): Use the equivalent of a value block to specify that there is no value for the duration of the curve segment. All values for the interpolated segment will evaluate to no value (None).
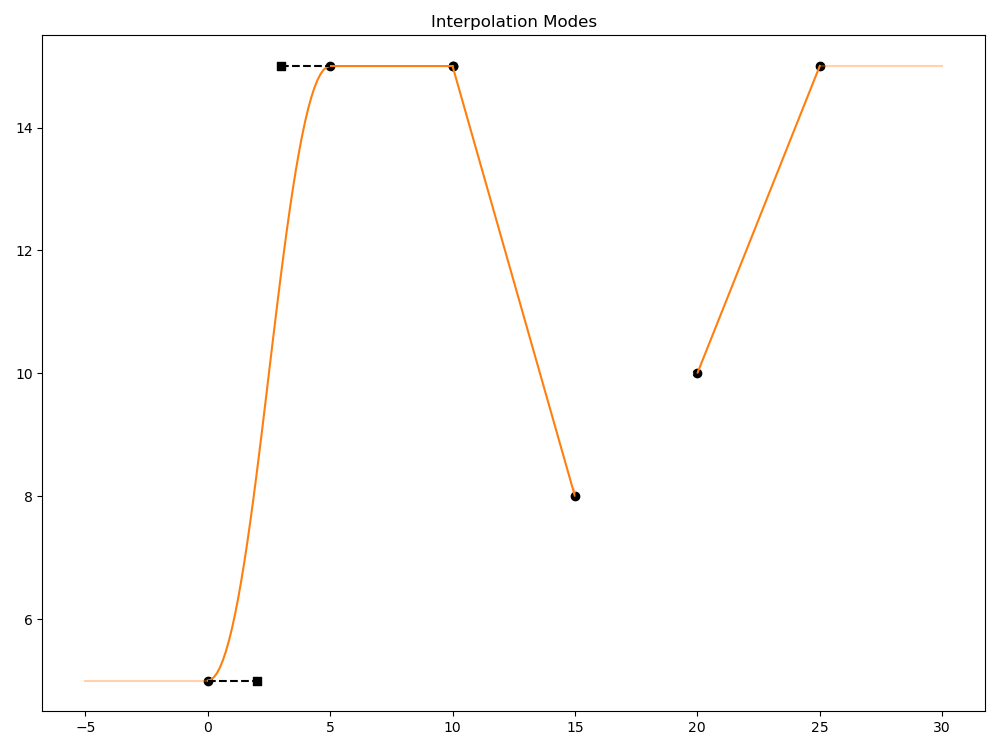
The following example shows a Spline with curve segments that use each interpolation mode:
The segment from time 0 to 5 uses curve interpolation (Bezier).
The segment from time 5 to 10 uses held interpolation. Any evaluation of the curve value in this time range will always be 15.
The segment from time 10 to 15 uses linear interpolation.
The segment from time 15 to 20 uses a value block. Any evaluation of the curve value in this range will evaluate to None.
The segment from time 20 to 25 uses linear interpolation.
def "Prim" {
    float attr.spline = {
         bezier,
         0: 5; pre (0, 0); post curve (2, 0),
         5: 15; pre (2, 0); post held,
         10: 15; post linear,
         15: 8; post none,
         20: 10; post linear,
         25: 15; post held,
    }
}
Tangent information: Information about the tangents for this knot. Tangents help define the curve shape for curve segments using curve interpolation. Tangent information is ignored for non-curve interpolation. A given knot can have “pre” tangent information and “post” tangent information that apply to curve segments “before” the knot and “after” the knot respectively.
A Note About Spline Continuity
When working with splines and tangents, it’s important to take into consideration continuity, which describes how smooth the curve shape is, particularly between two curve segments. OpenUSD splines allow for a variety of curve types, interpolation modes, and other features that can affect continuity.
There are several mathematical categorizations of continuity. When working with spline curve segments and knots, the following categorizations are the most commonly encountered.
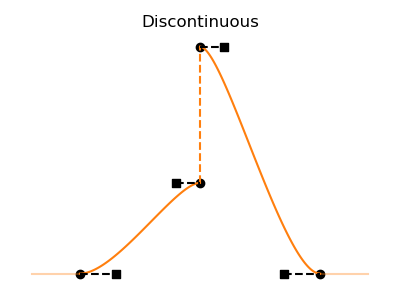
Discontinuous: Two curve segments do not meet at the same position. There is no continuity of the curve shape at the point where the segments join.
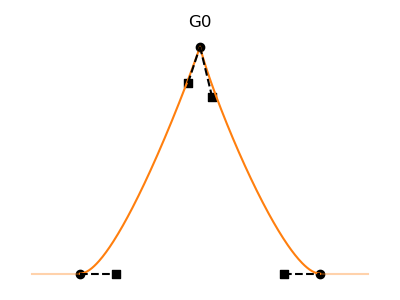
Positional continuity (G0): Two curve segments meet at the same position. The curves are joined without a discontinuity, but are not smooth.
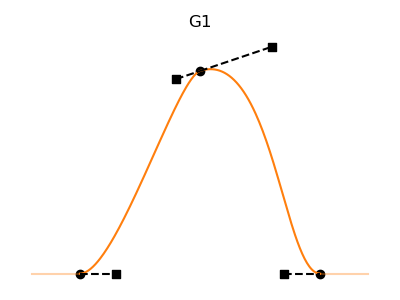
Tangential continuity (G1): Two curve segments meet at the same position and the tangents of the curve segments at this position are in the same direction. The curves are joined smoothly, but may have different “pre” and “post” shapes before and after the joint position.
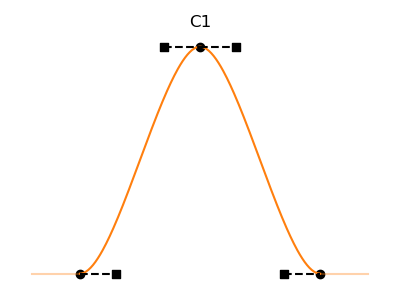
First-order parametric continuity (C1): Two curve segments meet at the same position and have tangents with the same direction and magnitude. The curves are joined smoothly and the curve shape is consistently smooth through the joint position.
In general, for the smoothest animation you should strive for smooth continuity (“C1” or “G1”) between curve segments. This ensures there are no sudden “pops” in the animated data when evaluated. Segments with G0 continuity or that are discontinuous may have undesired behavior when evaluated. When working with splines that use looping, OpenUSD provides some features that try to provide smoother continuity at loop boundaries, however OpenUSD cannot guarantee continuity in all cases, so extra care should be taken when using looping features.
Tangent information includes:
Tangent width: The overall width of the tangent across the curve segment span. In the following diagram this is the “width” line, not the “tangent” line. Widths are always positive values or 0 (the default), and can be scaled by layer offsets or automatic layer time scaling. Note that if the Spline curve type is Hermite, tangent widths are ignored, as Hermite splines automatically use a tangent width of one third of the segment width. See Working with Basic Spline Information for an example of a Spline using Hermite curve type.

Tangent slope: The “rise over run” (height divided by width) slope of the tangent. Can be positive (curve values increase over time), negative (curve values decrease over time), or 0 (the default). Tangent slope can be scaled by layer offsets or automatic layer time scaling, but are not scaled for time valued splines.
Tangent algorithm: An optional algorithm used to auto-generate tangents. By default this is Ts.TangentAlgorithmNone, which means that authored tangent width and slope values are used. Specifying Ts.TangentAlgorithmAutoEase will overwrite any authored tangent width and slope, and generate tangents using a cubic controlled blending algorithm (from AnimX) that computes a slope between the slopes to the knots on either side of this knot, guaranteeing G1 continuity. If there is a discontinuity in the spline at this knot (this knot has no previous or next knot, is dual valued, or is adjacent to a value blocked segment of the spline) then the computed slope will be 0.
Note
When serializing USD layers that have splines that use tangent algorithms such as AutoEase, the version of the serialized file will be updated to the minimum version that supports tangent algorithms (1.1 for .usda, 0.13 for crate files) if necessary.
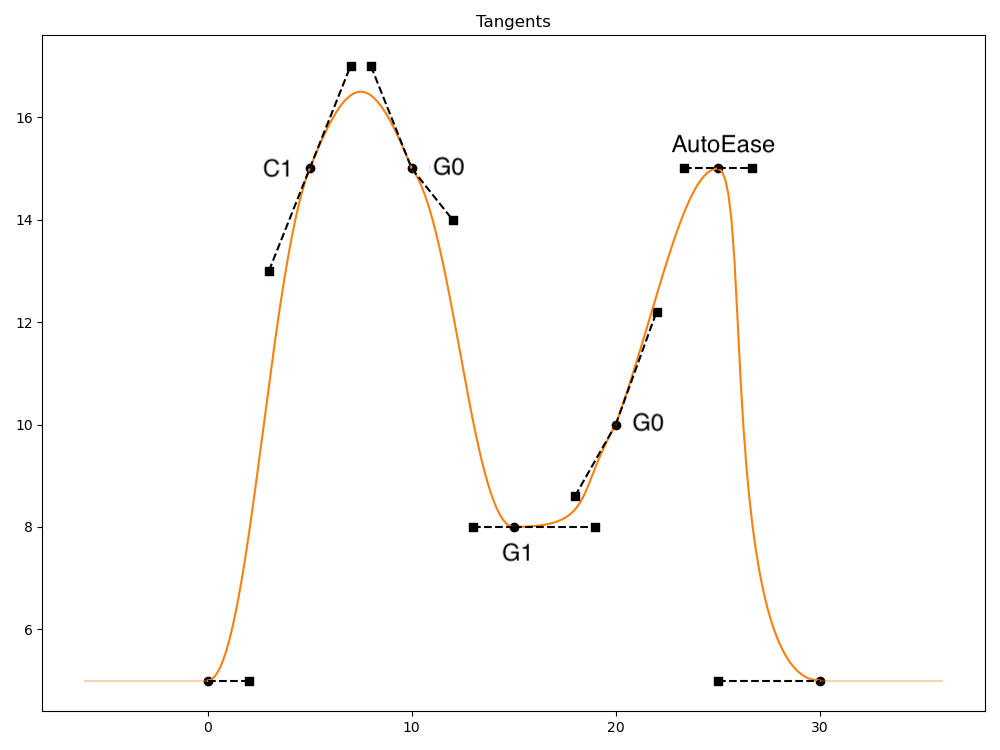
The following example demonstrates several different tangent widths and slopes.
The pre and post tangents for the knot at time 5 have the same width and slope. This results in very smooth “C1” (parametric) continuity across this knot.
The pre-tangent for the knot at time 15 has the same slope, but smaller width, than the post-tangent. This results in somewhat smooth “G1” (geometric) continuity.
The tangents at the knots at time 10 and 20 have different slopes and widths for the pre and post tangents, resulting in “G0” continuity, which can allow for sharp corners or bends in the spline shape.
The tangents at the knot at time 25 are configured to use the TangentAlgorithmAutoEase algorithm, and are automatically computed (to a slope of 0 and a width of approximately 1.67 in this example). The initial authored tangent width and slope values (2, 0.5) in this example are ignored.
def "Prim" {
    float attr.spline = {
         bezier,
         0: 5; pre (0, 0); post curve (2, 0),
         5: 15; pre (2, 1); post curve (2, 1),
         10: 15; pre (2, -1); post curve (2, -0.5),
         15: 8; pre (2, 0); post curve (4, 0),
         25: 15; pre (2, 0.5, autoEase); post curve (2, 0.5, autoEase),
         30: 5; pre (5, 0); post curve (0, 0),
    }
}
Custom data: Each knot can optionally have a dictionary of custom data, useful for associating custom data for a DCC tool or engine with a Spline knot. The custom data currently should not affect how the spline is evaluated. The following example has two custom data fields added to the knot at time 5.
def Sphere "Sphere"
{
    double radius.spline = {
        bezier,
        0: 5; pre (0, 0); post curve (2, 0),
        5: 10; pre (2, 0); post curve (2, 0); { string MyCustomDataKey = "MyCustomDataValue"; bool AnotherKey = 1 },
        10: 7; pre (2, 0); post curve (0, 0),
    }
}
For an example of authoring knots programmatically, see Working with Splines Programmatically below.
Refining Using Breakdown Knots
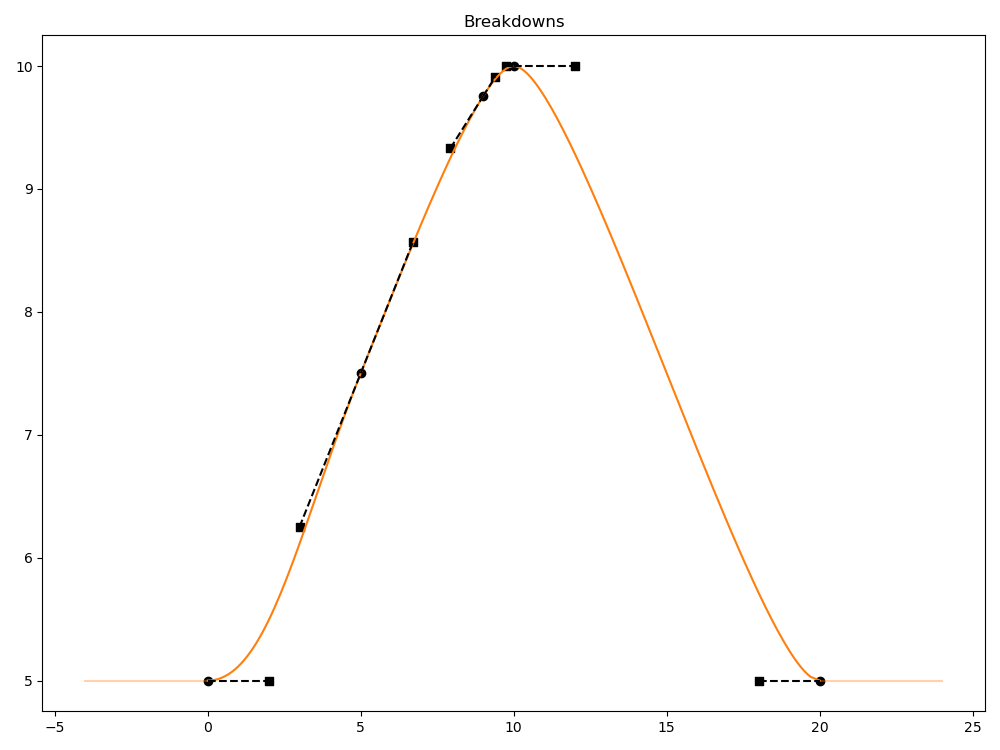
To more easily refine curves, OpenUSD provides the ability to add breakdown knots to curves. Breakdown knots allow for adding knots without impacting the current curve shape. You might, for example, want to preserve the shape of an existing curve but further refine a small section of the curve.
To programmatically add a breakdown knot, use the Ts.Spline.Breakdown() API with the desired time for the knot. A new knot is added at the given time so that the shape of the curve is preserved as much as possible. OpenUSD will modify neighboring knots as well to preserve curve shape if needed. The following example shows the before and after results of adding two breakdowns at time 5 and time 9 to a simple spline with 3 initial knots.
Spline before adding breakdowns:
def "Prim"
{
    custom float attr
    float attr.spline = {
        bezier,
        0: 5; pre (2, 0); post curve (2, 0),
        10: 10; pre (2, 0); post curve (2, 0),
        20: 5; pre (2, 0); post curve (2, 0),
    }
}
Spline after adding breakdowns. Note the slight adjustments to the tangents for the knots at time 0 and time 10.
def "Prim"
{
    custom float attr
    float attr.spline = {
        bezier,
        0: 5; pre (2, 0); post curve (0.9999999999999994, 0),
        5: 7.5; pre (1.9999999999999987, 0.625); post curve (1.4641016151377562, 0.625),
        9: 9.754809; pre (1.0717967697244912, 0.39623412); post curve (0.39230484541326405, 0.39623412),
        10: 10; pre (0.2679491924311215, 0); post curve (2, 0),
        20: 5; pre (2, 0); post curve (2, 0),
    }
}
Add breakdowns after authoring all the knots for your spline. If you add new knots after adding breakdowns, the breakdown knots will not be automatically adjusted to account for the new knots.
In some situations a breakdown knot cannot be added. If a knot already exists at the desired breakdown knot time, no new knot will be added. Similarly, if the desired breakdown time is in a region of the spline that is being affected by inner looping, no knot will be added, as the knot would be shadowed by loop knots and curve segments.
For programmatic examples of adding breakdown knots, see Adding Breakdown Knots in the Working with Splines Programmatically section.
Avoiding Curve Regression
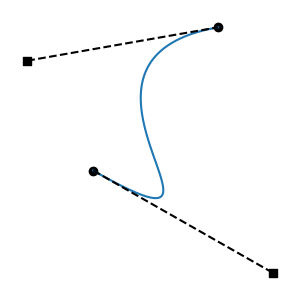
Splines, in particular Bezier splines, allow for knot tangent configurations that can, in certain circumstances, result in regressive curve segments. Such segments will have inherent problems during evaluation, such as having more than one value at a particular time, and will not be usable as animation data. The following example shows a regressive curve segment due to tangents with long widths.
def "Prim"
{
    custom float attr
    float attr.spline = {
        bezier,
        156: 0; pre (0, 0); post curve (15.8, -1.3),
        167: 28.8; pre (16.8, 0.4); post curve (0, 0),
    }
}
Note
As a general best practice, avoid creating tangent widths that cross the opposite knot’s time position, as this will commonly cause regressive segments.
DCC tools often have features that prevent the authoring of regressive segments; however regressive segments could still be created programmatically, or through spline transformation operations, or even accidental manual editing of USD data. To address splines with regressive segments, OpenUSD provides features to automatically prevent authoring tangents that cause regressive segments, as well as APIs to adjust and correct tangents that are causing regressive segments.
By default, OpenUSD is built with automatic anti-regression fixing enabled. This ensures that when knots are authored, tangents are adjusted if needed to avoid regressive segments. OpenUSD also applies anti-regression fixing at spline evaluation time if necessary. Additionally, OpenUSD provides APIs such as Ts.Spline.HasRegressiveTangents() and AdjustRegressiveTangents() that can be used to detect and fix regressive segments.
OpenUSD’s default “Keep Ratio” strategy shortens both tangents proportionally to resolve regression while preserving their length ratio. There are other strategies that OpenUSD supports, but “Keep Ratio” was chosen as the best general purpose strategy that produces results closest to the original segment shape.
See Working with Splines Programmatically for examples of changing or disabling the anti-regression strategy OpenUSD uses.
Looping and Extrapolation
OpenUSD Splines support looping, which allows for repeating / re-using portions of a spline. Splines support inner looping, where a portion of the existing spline is used as a “prototype region” and repeated a finite number of times before and/or after the prototype region. Splines also support different extrapolation modes, including extrapolated looping, where the entire spline is repeated an infinite number of times before and/or after the entire spline. Typically you’ll use inner looping for finite repetition within a longer sequence, and extrapolation looping for indefinite repetition.
Working with Inner Looping
Inner looping lets you take a portion of your spline (called the “prototype region”) and duplicate it a finite number of times before and/or after the prototype region. This is useful for situations where you need to repeat a portion of your animation briefly, and then continue (or precede) with a different animation. For example, you might want to animate a character starting in a neutral pose, clapping their hands several times, and then returning to the neutral pose (or a different pose).
To use inner loops, define inner loop parameters (LoopParams) for the spline. This information includes details on the start and end times for the prototype region, the number of times you want the region to loop before and/or after the region, and an optional value offset. Note that you can only define one prototype region per spline.
Note
Inner looping is a spline feature that may not be supported in some DCC tools and engines. If you need maximum interoperability, consider seeing if extrapolation looping, possibly in combination with value clips, can be used instead of inner looping.
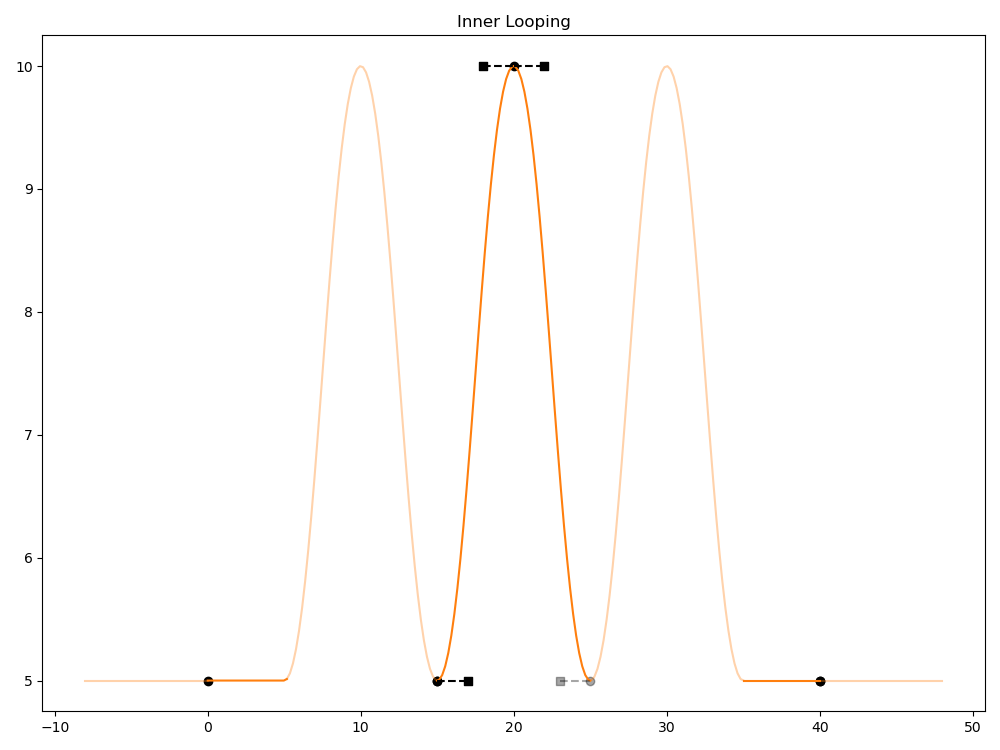
The following example specifies a prototype region from time 15 to time 25, and then applies one pre-loop and one post-loop.
def "Prim"
{
    custom float attr
    float attr.spline = {
        bezier,
        loop: (15, 25, 1, 1, 0),
        0: 5; pre (0, 0); post held,
        15: 5; post curve (2, 0),
        20: 10; pre (2, 0); post curve (2, 0),
        25: 5; pre (2, 0); post held,
        40: 5; post held,
    }
}
See Working with Splines Programmatically for a Python example of setting LoopParams.
The prototype region start and end times (LoopParams.protoStart, LoopParams.protoEnd) specify the time range of the portion of the spline that will be copied.
The number of loop copies specified to be created before and/or after the prototype region (LoopParams.numPreLoops, LoopParams.numPostLoops) must be a positive value or 0.
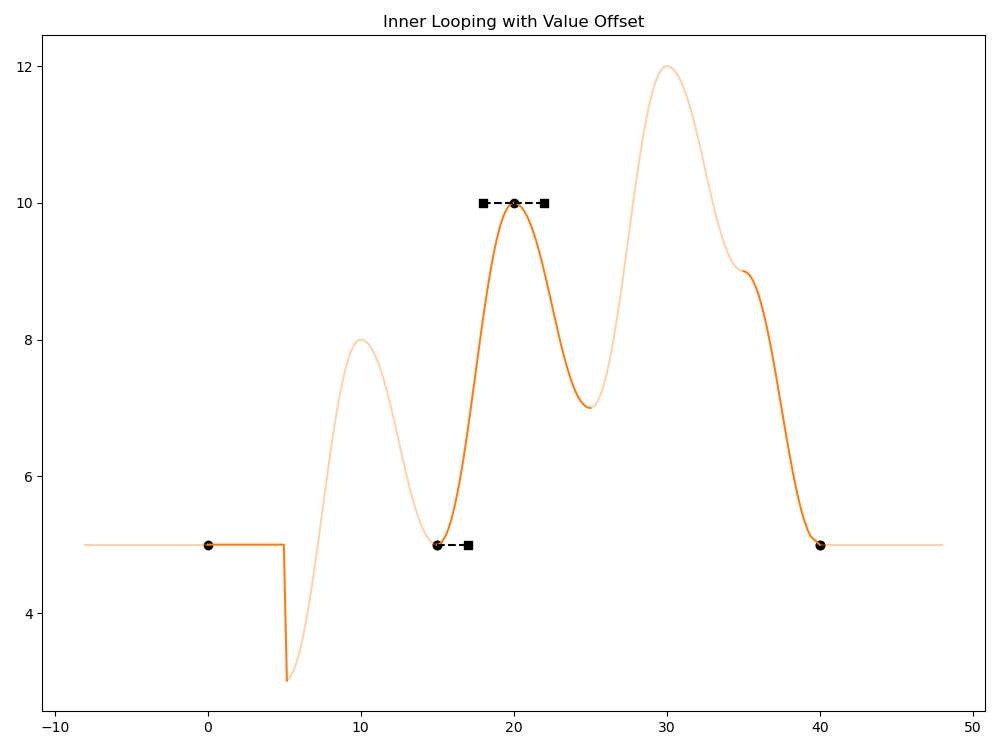
An optional value offset loop parameter (LoopParams.valueOffset) adds a positive or negative offset to the knot values for each loop. If the value at the end of the prototype region is not the same as the start value, this offset shifts the knot values of each copy relative to the previous iteration, accumulating with each copy. Post loop copies step up by valueOffset from the prototype, while pre loop copies step down. So, for example, if you specify a valueOffset of 5, and the first knot of the region has a value of 10, the first knot of the first post loop will have a value of 15, the first knot of the second post loop will have a value of 20, and the first knot of the first pre loop will have a value of 5.
The following example spline uses the same knot data and inner loop parameters as the previous example, but with a valueOffset of 2. Notice that we have a discontinuity at time 5 to account for the held value prior to the offset pre-loop.
def "Prim"
{
    custom float attr
    float attr.spline = {
        bezier,
        loop: (15, 25, 1, 1, 2),
        0: 5; pre (0, 0); post held,
        15: 5; post curve (2, 0),
        20: 10; pre (2, 0); post curve (2, 0),
        25: 5; pre (2, 0); post held,
        40: 5; post held,
    }
}
Inner looping is applied when the spline is evaluated. OpenUSD creates knots to represent the looping in memory, but does not copy these knots and segments back into the spline (if you want this, you will need to explicitly bake the looping on the spline, see Working with Splines Programmatically). At a minimum, the following must be true for OpenUSD to apply inner looping:
protoStart time must be less than protoEnd time.
At least one of numPreLoops or numPostLoops must be greater than 0. Note that numPreLoops and numPostLoops cannot be negative.
There must be a valid knot at protoStart time. Note that this knot can be authored before or after the inner looping parameters are set on the spline; OpenUSD just needs a valid knot at protoStartTime when evaluating the spline. Note that a knot is not needed at protoEnd time, as it will get effectively overwritten by looping copies.
If protoStart, protoEnd, numPreLoops, numPostLoops, and valueOffset are all 0, this is treated as clearing inner looping for the spline, and inner loop params will not be written when the USD layer is serialized.
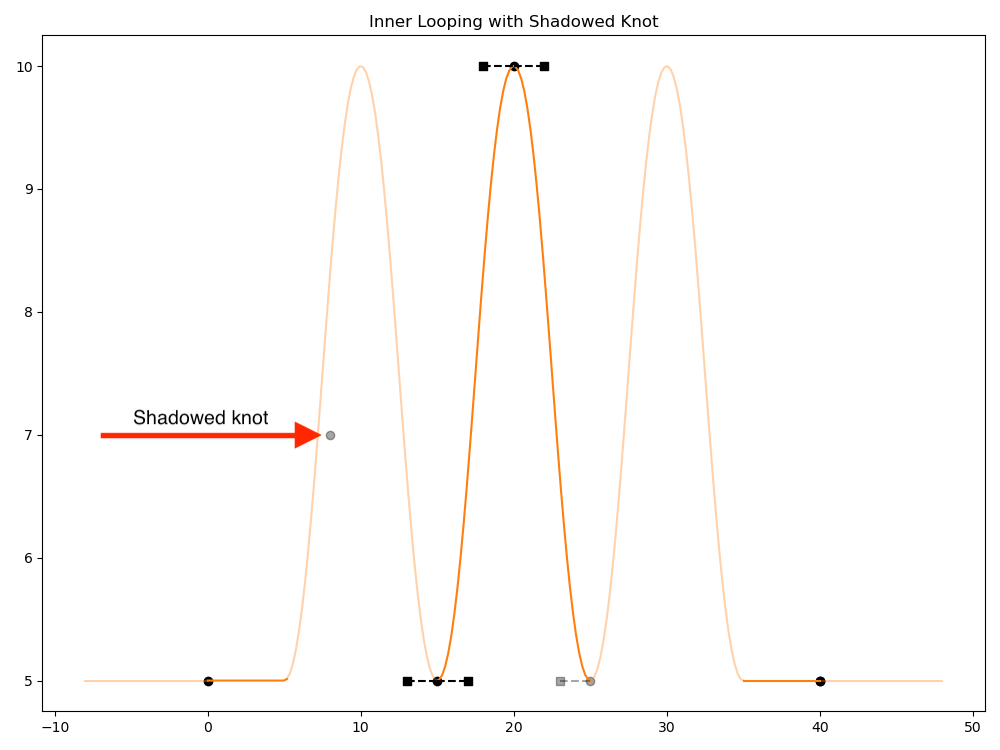
When OpenUSD evaluates a spline with defined inner loop params, any knots that are authored in the pre or post loop regions are ignored for evaluation purposes. These knots are effectively “shadowed” by the knots and segments of the looped regions. Note that these knots still remain in the spline configuration, retrievable via Knot query APIs, and will still be present in any serialized attribute data. If you need to fully overwrite these knots with the loop region knots, the loops should be “baked” out (see Working with Splines Programmatically below). In the following example, the Knot at time 8 with value 7 is shadowed by the pre-loop that is applied from time 5 to time 15.
def "Prim"
{
    custom float attr
    float attr.spline = {
        bezier,
        loop: (15, 25, 1, 1, 0),
        0: 5; pre (0, 0); post held,
        8: 7; post held,
        15: 5; post curve (2, 0),
        20: 10; pre (2, 0); post curve (2, 0),
        25: 5; pre (2, 0); post held,
        40: 5; post held,
    }
}
When OpenUSD applies the prototype region to the loop regions, a copy of the starting knot (of the prototype region) is always used at the end of the copied region. This is done to provide better continuity at the point where loop copies intersect. However, this will often change the shape of the prototype region (by potentially changing the curve shape of the end of the region). This will also effectively overwrite (shadow) any knot at the exact protoEnd time of the prototype region. Generally, when using inner looping you should inspect the looping results for any unwanted curve shape changes, and adjust your prototype region accordingly.
OpenUSD will apply any layer offset scaling and offsets to the generated inner loop knots after the loop knots have been created.
Working with Extrapolation
Extrapolation defines the spline’s behavior before the first knot or after the last. Use extrapolation to define how the spline attribute should be evaluated outside of the first and last spline knots. For example, you might want the attribute value to remain at the last knot’s value, or repeat the full spline infinitely.
By default, OpenUSD uses Held extrapolation using the values of the first and last knot of the spline for the pre-extrapolation and post-extrapolation respectively. This is similar to the extrapolation behavior with TimeSamples. With the following simple example, the pre-extrapolation value is 5, and the post-extrapolation value is 3.
def "Prim"
{
    custom float attr
    float attr.spline = {
        bezier,
        15: 5; pre (2, 0.5); post curve (2, 0.9),
        20: 10; pre (2, 0); post curve (2, 0),
        25: 3; pre (2, 0.5); post curve (2, 0.9),
    }
}
You can explicitly set extrapolation to Held which will yield the same results. The following example Python code explicitly sets the extrapolation mode to Held for both pre-extrapolation and post-extrapolation.
spline.SetPreExtrapolation(Ts.Extrapolation(Ts.ExtrapHeld))
spline.SetPostExtrapolation(Ts.Extrapolation(Ts.ExtrapHeld))
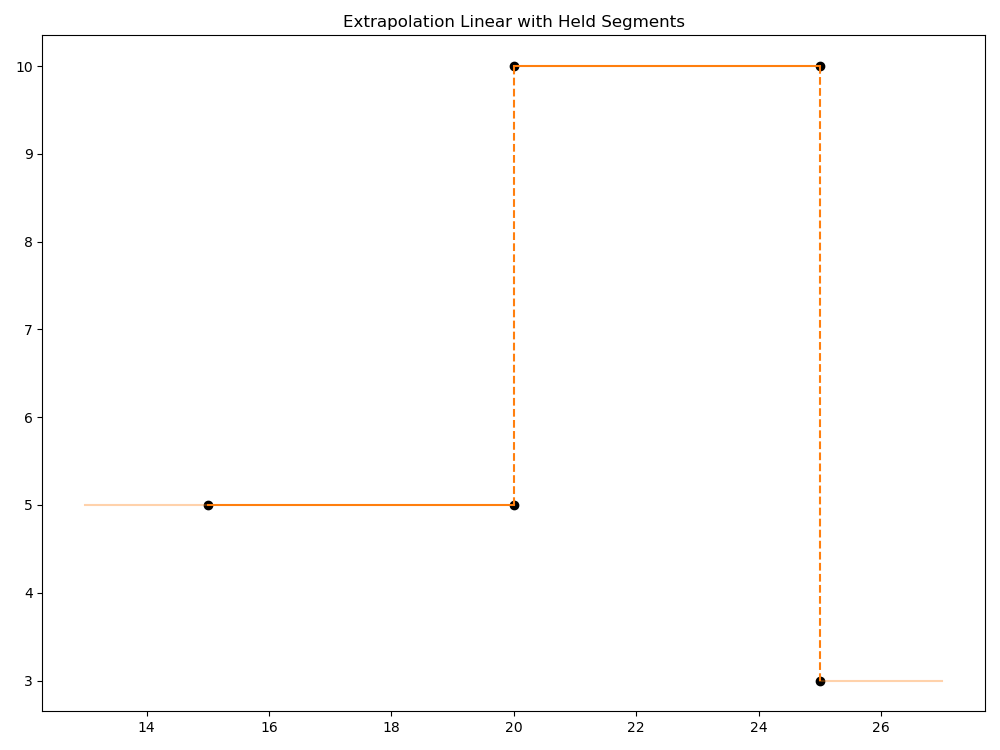
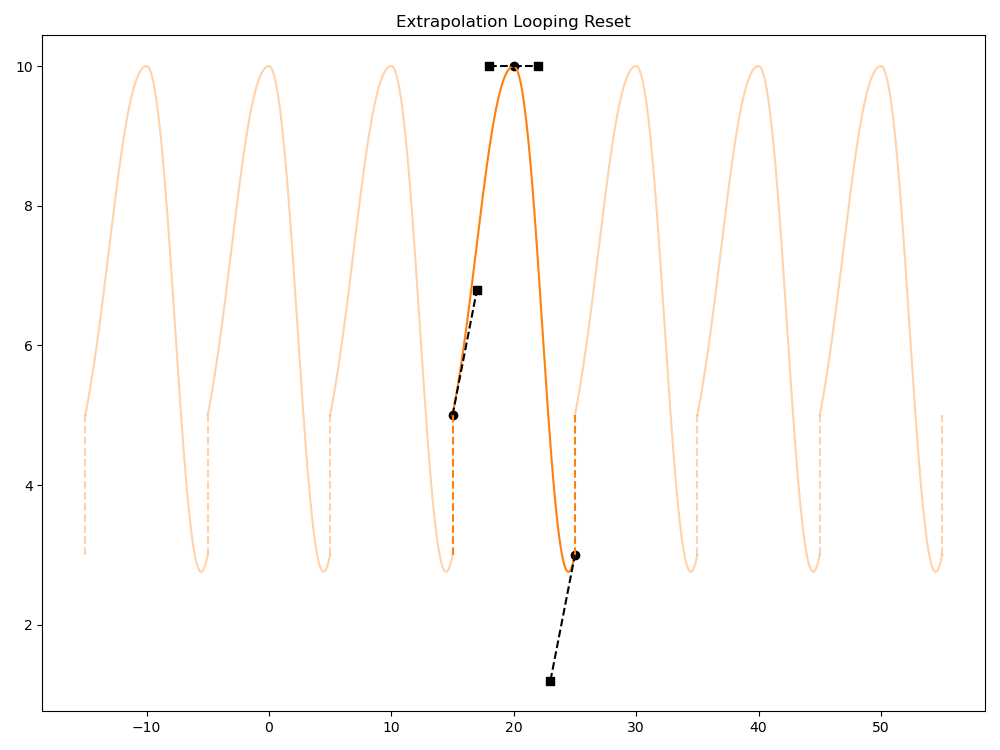
OpenUSD provides the following additional extrapolation modes: ValueBlock, Linear, Sloped, Repeat, Reset, and Oscillate. The latter three modes all involve looping the entire spline curve.
Value Block (Ts.ExtrapValueBlock): Anything outside the spline time boundary evaluates to no value (None).
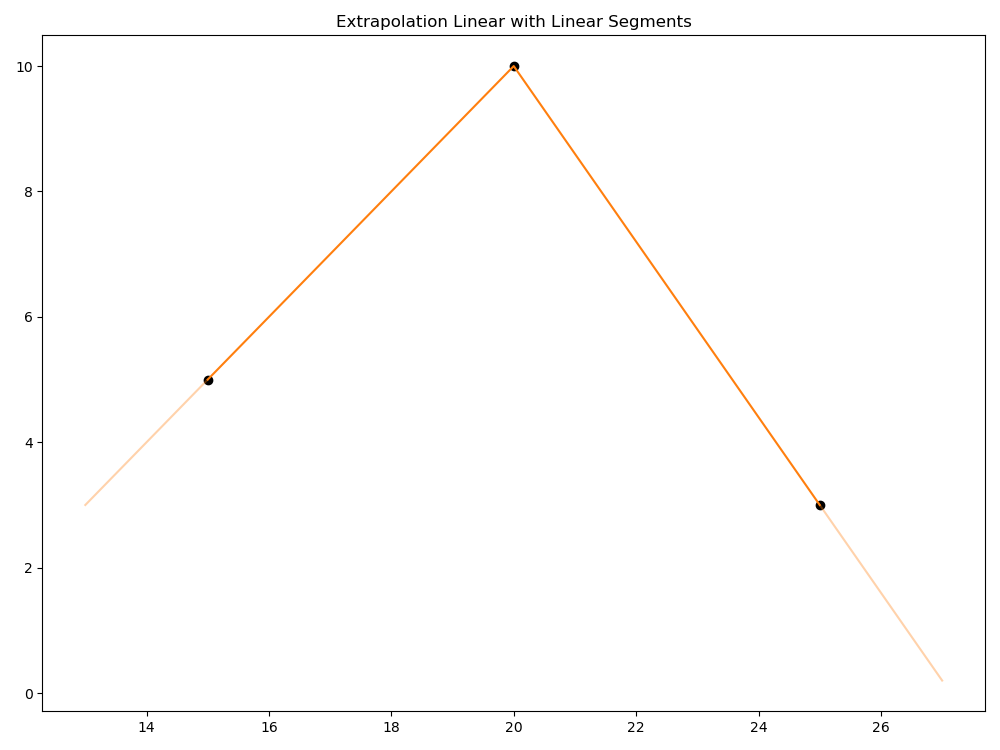
Linear (Ts.ExtrapLinear): The extrapolation is a straight line with a slope based on the interpolation mode of the first/last curve segments, as follows.
If the curve segment interpolation mode is Curve (Ts.InterpCurve), linear extrapolation uses the slope of the inward-facing tangent at the terminal knot: the postTangent of the first knot governs pre-extrapolation, and the preTangent of the last knot governs post-extrapolation. In the example below, a spline with 3 curve segments uses pre and post Linear extrapolation.
def "Prim"
{
    custom float attr
    float attr.spline = {
        bezier,
        pre: linear,
        post: linear,
        15: 5; pre (2, 0.5); post curve (2, 0.9),
        20: 10; pre (2, 0); post curve (2, 0),
        25: 3; pre (2, 0.9); post curve (2, 0.5),
    }
}
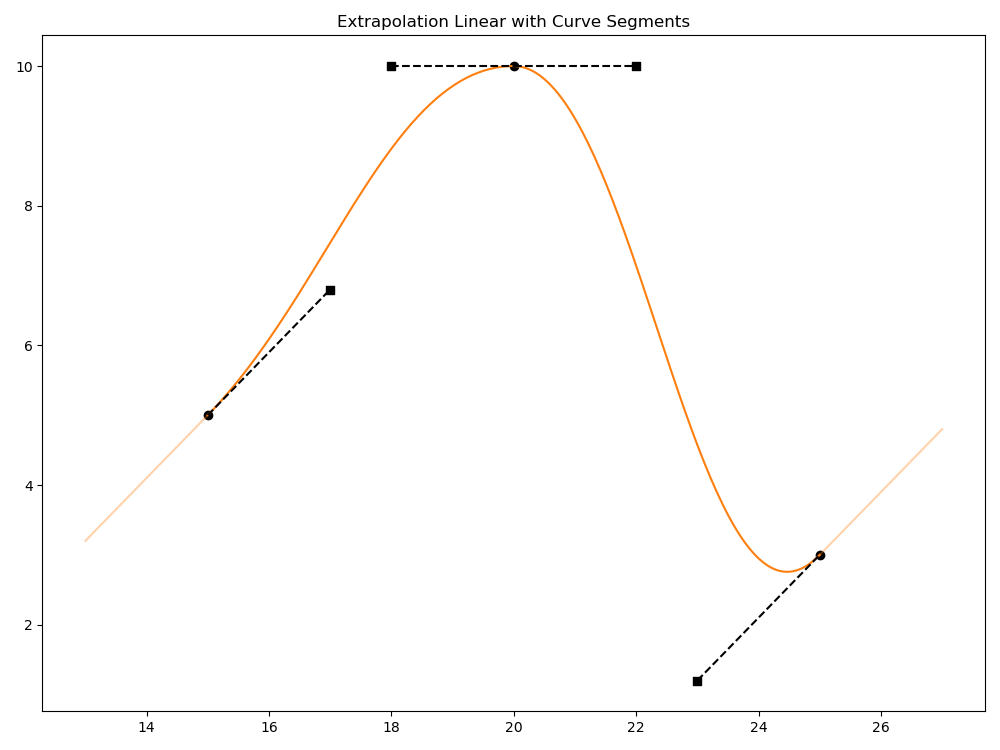
If the interpolation mode of the first/last segment is Linear, the slope of the extrapolation line matches the slope of the linear curve segment.
def "Prim"
{
    custom float attr
    float attr.spline = {
        pre: linear,
        post: linear,
        15: 5; pre (2, 0.5); post linear,
        20: 10; post linear,
        25: 3; post linear,
    }
}
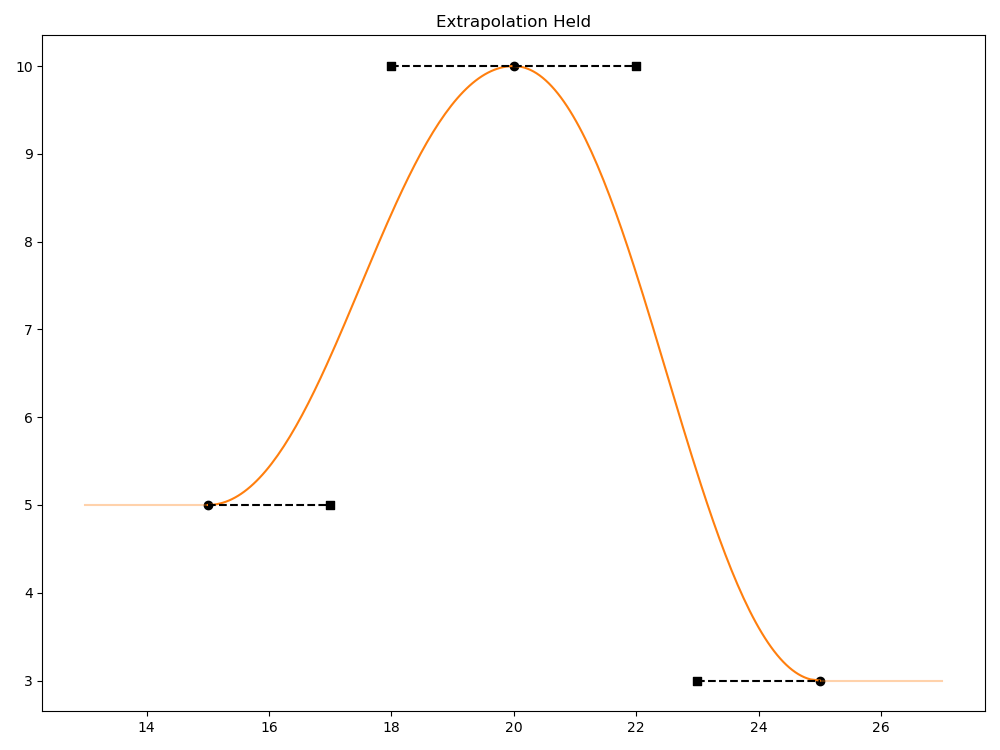
If the interpolation mode of the first/last segment is Held, the extrapolation line is a 0 slope line of the first/last knot value.
def "Prim"
{
    custom float attr
    float attr.spline = {
        pre: linear,
        post: linear,
        15: 5; post held,
        20: 10; post held,
        25: 3; post held,
    }
}
Finally, if the interpolation mode of the first/last segment is ValueBlock, the extrapolation line is a 0 slope line of the first/last knot value, similar to the behavior if the first/last segment is Held. Linear extrapolation must always result in a straight line, so the ValueBlock interpolation mode can’t be utilized by the extrapolation. If you need value block extrapolation behavior, use Ts.ExtrapValueBlock.
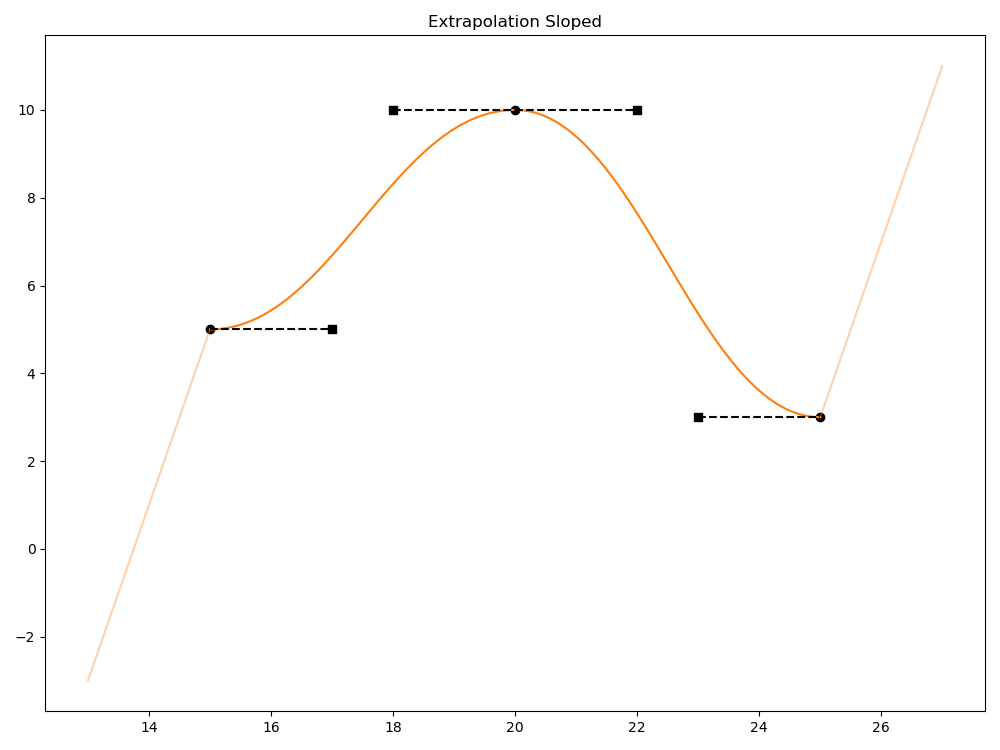
Sloped (Ts.ExtrapSloped): Similar to Linear, the extrapolation is a straight line, however the slope of the line is explicitly set as part of the extrapolation configuration. In the following example the slope is set to 4 for both the pre-extrapolation and post-extrapolation.
def "Prim"
{
    custom float attr
    float attr.spline = {
        bezier,
        pre: sloped(4),
        post: sloped(4),
        15: 5; pre (2, 0); post curve (2, 0),
        20: 10; pre (2, 0); post curve (2, 0),
        25: 3; pre (2, 0); post curve (2, 0),
    }
}
Programmatically, you would set the slope on the Ts.Extrapolation object. For example the following Python code sets the slope to 4.
extrapConfig = Ts.Extrapolation(Ts.ExtrapSloped)
extrapConfig.slope = 4
spline.SetPreExtrapolation(extrapConfig)
Note that the slope can be scaled by layer offsets or automatic layer time scaling. For more examples of setting Ts.Extrapolation programmatically, see Working with Splines Programmatically.
Repeat (Ts.ExtrapLoopRepeat): The extrapolation is a repeated copy of the spline curve, effectively looping the spline infinitely. For each copy, an offset is applied that is automatically calculated as the difference between the last and first knot values. The offset accumulates as it gets applied successively to each copy (this behavior is similar to the accumulation of valueOffset for inner loops).
Note
If either the first or last knots used for the repeat extrapolation are dual-valued knots, the offset for pre-extrapolation uses the difference between the last knot preValue and the first knot preValue. Post-extrapolation uses the difference between the last knot value and the first knot value.
def "Prim"
{
    custom float attr
    float attr.spline = {
        bezier,
        pre: loop repeat,
        post: loop repeat,
        15: 5; pre (2, 0.5); post curve (2, 0.9),
        20: 10; pre (2, 0); post curve (2, 0),
        25: 3; pre (2, 0.9); post curve (2, 0.5),
    }
}
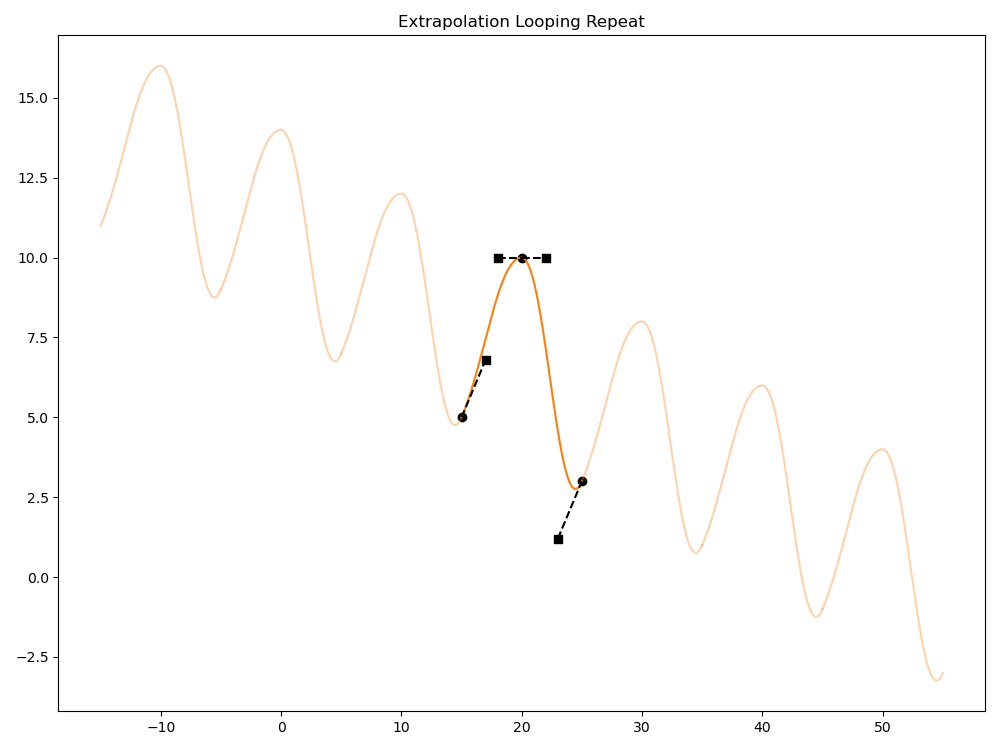
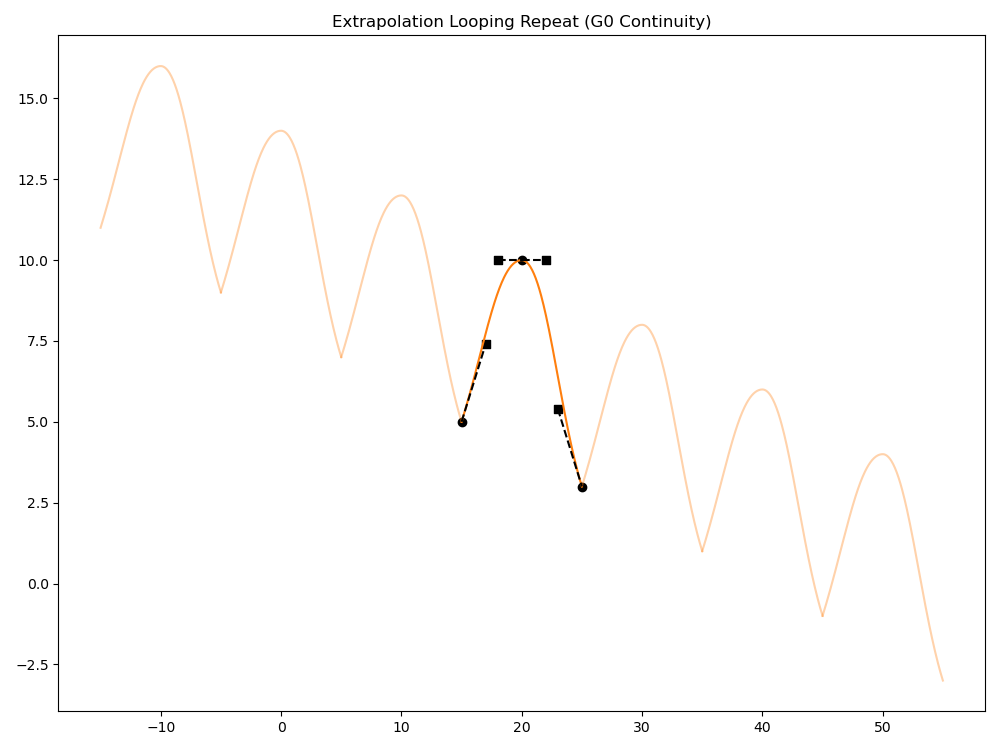
The automatic offset tries to avoid value discontinuities at the copy boundaries, particularly when the first and last knot values differ. However, note that the knot at a copy boundary uses the preTangent data from the last knot and the postTangent data from the first knot, which can impact curve shape continuity if the tangents have different directions and/or widths. The following example has differing tangent slopes, resulting in curve shape “cusps” (G0 continuity) at the copy boundaries.
def "Prim"
{
    custom float attr
    float attr.spline = {
        bezier,
        pre: loop repeat,
        post: loop repeat,
        15: 5; pre (2, 0.5); post curve (2, 1.2),
        20: 10; pre (2, 0); post curve (2, 0),
        25: 3; pre (2, -1.2); post curve (2, 0),
    }
}
Reset (Ts.ExtrapLoopReset): The extrapolation is a repeated copy of the spline curve, effectively looping the spline infinitely. For each copy, the knot values are copied exactly, with no offset. This can result in discontinuities at the copy boundaries.
def "Prim"
{
    custom float attr
    float attr.spline = {
        bezier,
        pre: loop reset,
        post: loop reset,
        15: 5; pre (2, 0.5); post curve (2, 0.9),
        20: 10; pre (2, 0); post curve (2, 0),
        25: 3; pre (2, 0.9); post curve (2, 0.5),
    }
}
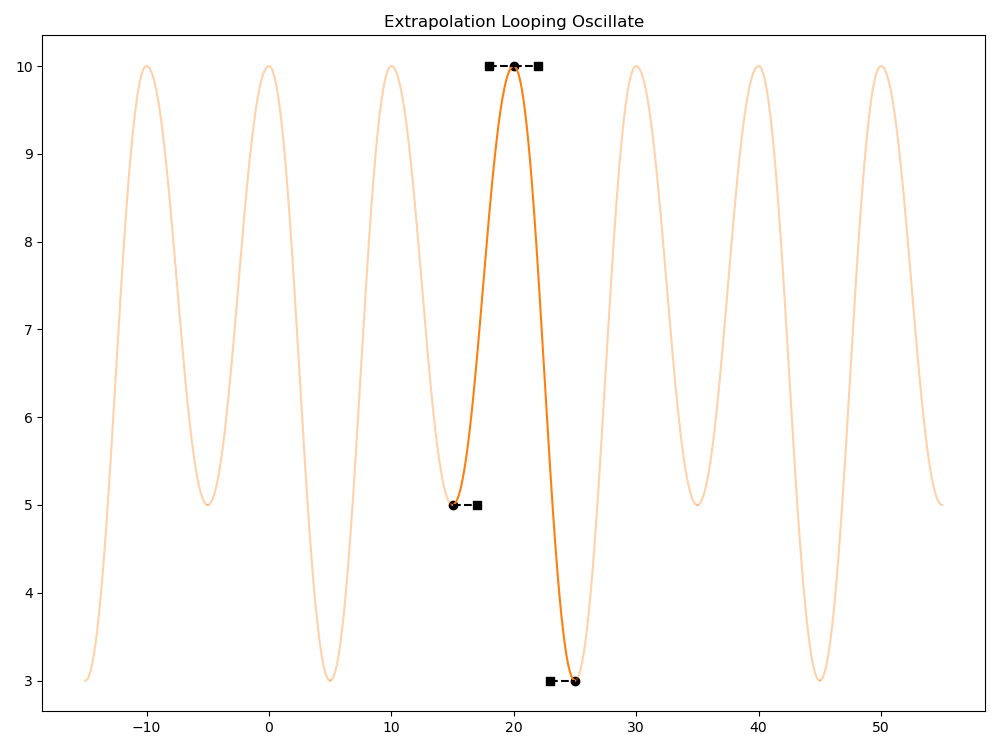
Oscillate (Ts.ExtrapLoopOscillate): The extrapolation is a repeated copy of the spline curve, effectively looping the spline infinitely. This is similar to Reset, except that the shape of the curve is time-reversed in every other iteration, effectively mirroring every other copy. Like Repeat, this preserves some continuity by ensuring the values at each copy boundary do not differ. However, because the tangents are also mirrored, there will be curve shape “cusps” (G0 continuity) at the copy boundaries, unless the tangent slopes of the first/last knots are 0. The following example uses 0-slope tangents.
def "Prim"
{
    custom float attr
    float attr.spline = {
        bezier,
        pre: loop oscillate,
        post: loop oscillate,
        15: 5; pre (2, 0); post curve (2, 0),
        20: 10; pre (2, 0); post curve (2, 0),
        25: 3; pre (2, 0); post curve (2, 0),
    }
}
Note that while you can currently combine inner looping with extrapolation looping, this may result in overly complex splines that are harder to maintain. OpenUSD will apply inner loop information first, and then apply extrapolation looping to the result. You also cannot use extrapolation looping with a specific loopBoundaryTime (see Using loopBoundaryTime to Refine Extrapolation Looping below) and inner looping — OpenUSD will treat this as an invalid spline.
OpenUSD will apply any layer offset scaling and offsets to any generated extrapolation looping knots after the loop knots have been created.
Using loopBoundaryTime to Refine Extrapolation Looping
OpenUSD by default copies the entire spline when making looping copies, using any of the looping extrapolation modes (Ts.ExtrapLoopRepeat, Ts.ExtrapLoopReset, Ts.ExtrapLoopOscillate). However, you may have circumstances where you only want to infinitely repeat a portion of the entire spline. Similar to inner looping, you can specify a portion of the spline to copy, rather than the entire spline, by specifying a loopBoundaryTime for pre-extrapolation and/or post-extrapolation looping.
Important
You cannot use loopBoundaryTime (and extrapolation looping) with a spline that also uses inner looping.
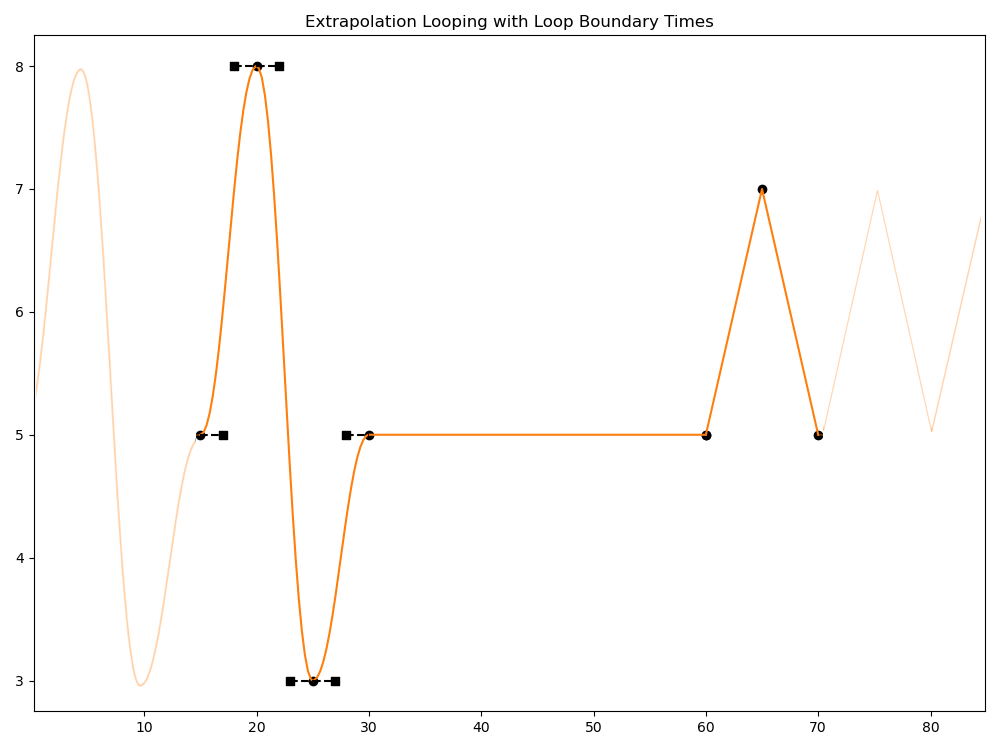
For pre-extrapolation with loopBoundaryTime, the portion of the spline to use starts at the beginning of the spline and goes to the knot at the loopBoundaryTime. For post-extrapolation, the portion starts at the knot at the loopBoundaryTime and goes to the end of the spline. You can use different loopBoundaryTime values for the pre and post extrapolation settings. In the following example, we use Repeat looping for pre-extrapolation using the Bezier portion of the spline from time 15 to 30, and a Repeat looping for post-extrapolation using the Linear portion of the spline from time 60 to 70.
def "Prim"
{
    custom float attr
    float attr.spline = {
        bezier,
        pre: loop repeat(30),
        post: loop repeat(60),
        15: 5; pre (2, 0); post curve (2, 0),
        20: 8; pre (2, 0); post curve (2, 0),
        25: 3; pre (2, 0); post curve (2, 0),
        30: 5; pre (2, 0); post held,
        60: 5; post linear,
        65: 7; post linear,
        70: 5; post linear,
    }
}
loopBoundaryTime must be set to a time that matches the time for a knot in the spline. If there is no knot at loopBoundaryTime, the spline portion is considered invalid and is not used, and the extrapolation will be Value Block (Ts.ExtrapValueBlock). If loopBoundaryTime is set to the first knot of the spline for pre-extrapolation, or the last knot of the spline for post-extrapolation, this creates an unusable portion of the spline, and the pre or post extrapolation will use a Held (Ts.ExtrapHeld) extrapolation instead.
Note
When serializing USD layers that have splines that use loopBoundaryTime, the version of the serialized file will be updated to the minimum version that supports loopBoundaryTime (1.3 for .usda, 0.15 for crate files) if necessary.
Working with Splines Programmatically
For working with splines programmatically, OpenUSD provides APIs for common tasks such as evaluating, querying, baking, authoring, refining, and configuring anti-regression.
Evaluating Splines
If you are working with an attribute that has authored spline data, you can evaluate the spline by getting the attribute value at a specific TimeCode (using Usd.Attribute.Get(timeCode), or a Usd.AttributeQuery object). This is the recommended approach when working with attributes, as it ensures attribute value resolution is properly taken into account.
value = attr.Get(Usd.TimeCode(5))
print(f"At time 5, attribute value is: {value}")
If you need to work directly with splines, you can use the Ts.Spline.Eval APIs to get the evaluated value at a given time.
value = spline.Eval(5)
print(f"At time 5, value is: {value}")
If you just need to inspect spline data and don’t need evaluated values, you can use spline APIs to query spline configuration and knots. The following Python example iterates over the list of knots for a spline.
knots = spline.GetKnots()
for knot in knots.values():
    print(f"knot at time {knot.GetTime()}, value: {knot.GetValue()}, "
        f"preTanWidth:{knot.GetPreTanWidth()}, "
        f"preTanSlope:{knot.GetPreTanSlope()}, "
        f"postTanWidth:{knot.GetPostTanWidth()}, "
        f"postTanSlope:{knot.GetPostTanSlope()}, "
        f"knot is dual-valued:{knot.IsDualValued()}")
Baking Spline Knots
Note that features like inner looping and extrapolation looping will not add knots and segments of the looped copies to the spline. If you need the actual knots that get created for looped copies, you should bake the looping results back into the spline. To bake out knots for inner loops only, use BakeInnerLoops() or GetKnotsWithInnerLoopsBaked(). BakeInnerLoops() modifies the spline, replacing the spline’s knots with the baked results, so keep in mind that any authored knots that are shadowed by the loop copies will get overwritten by this operation. BakeInnerLoops() also removes inner loop params from the spline. GetKnotsWithInnerLoopsBaked() does not modify the spline, and returns the baked knot results in a map that can be used to create a new spline, if needed.
# This doesn't modify the spline, but returns a set of
# the knots that would be baked to the spline.
newKnots = spline.GetKnotsWithInnerLoopsBaked()
for knot in newKnots.values():
    # ... inspect and use baked knots as needed ...

# This modifies the spline
bakeResult = spline.BakeInnerLoops()
if not bakeResult:
    # ... bake failed, resolve as needed ...
Neither of the previous APIs will bake extrapolation loops. To bake out a subset of the knots that would be created for extrapolation looping, use GetKnotsWithLoopsBaked() with a specific time range. Note that GetKnotsWithLoopsBaked() will bake out knots for both extrapolation loops and inner loops (if both are used within the specified time range).
timeInterval = Gf.Interval(0, 45)
newKnots = spline.GetKnotsWithLoopsBaked(timeInterval)
for knot in newKnots.values():
    # ... inspect and use baked knots as needed ...
When baking knots, note that in cases where loop boundaries would create a discontinuity, OpenUSD may create dual-valued knots to properly capture this discontinuity.
Adding Breakdown Knots
For refining splines, as mentioned in Refining Using Breakdown Knots above, you can use APIs to add breakdown knots to a spline to add additional knots while preserving the spline shape. The following example adds breakdown knots at time 5 and time 9.
# ... Define spline and add knots ...

# Add a breakdown knot at time 5
spline.Breakdown(5)
# Add another breakdown at time 9
spline.Breakdown(9)
Breakdown knots are calculated based on the current authored set of knots on the spline. Adding new knots after adding breakdown knots will not automatically adjust the breakdown knots.
Configuring Anti-Regression Strategies
You can change which anti-regression strategy to use while authoring, or disable it altogether, by using an AntiRegressionAuthoringSelector selector. The following Python code disables anti-regression corrections for an authoring context.
# Temporarily disable anti-regression while authoring. Other options include
# different anti-regression strategies: Ts.AntiRegressionContain,
# Ts.AntiRegressionKeepRatio, and Ts.AntiRegressionKeepStart.
with Ts.AntiRegressionAuthoringSelector(Ts.AntiRegressionNone):

    # Author a spline for attribute "attr"
    typeName = str(attr.GetTypeName())
    spline = Ts.Spline(typeName)
    spline.SetCurveType(Ts.CurveTypeBezier)

    # ... add Knots ...

    # Set spline on attr
    attr.SetSpline(spline)
See the API docs for more technical details on the different anti-regression strategies, and APIs that clients can use to detect and correct regressive segments.
Other Spline APIs
OpenUSD also provides additional utility spline APIs, such as comparing two splines (Diff()), sampling a spline into a set of piecewise linear polylines for drawing purposes (Sample()), dealing with regression (as described in Avoiding Curve Regression), and determining if a spline has any sort of looping (HasLoops()). See the API documentation for more details.
Visualizing Splines
To visualize a spline’s actual evaluated shape (and potentially other aspects, such as knots and knot tangents), usdview provides a spline view that shows the spline knots and curve segments for any attributes that have authored spline data.
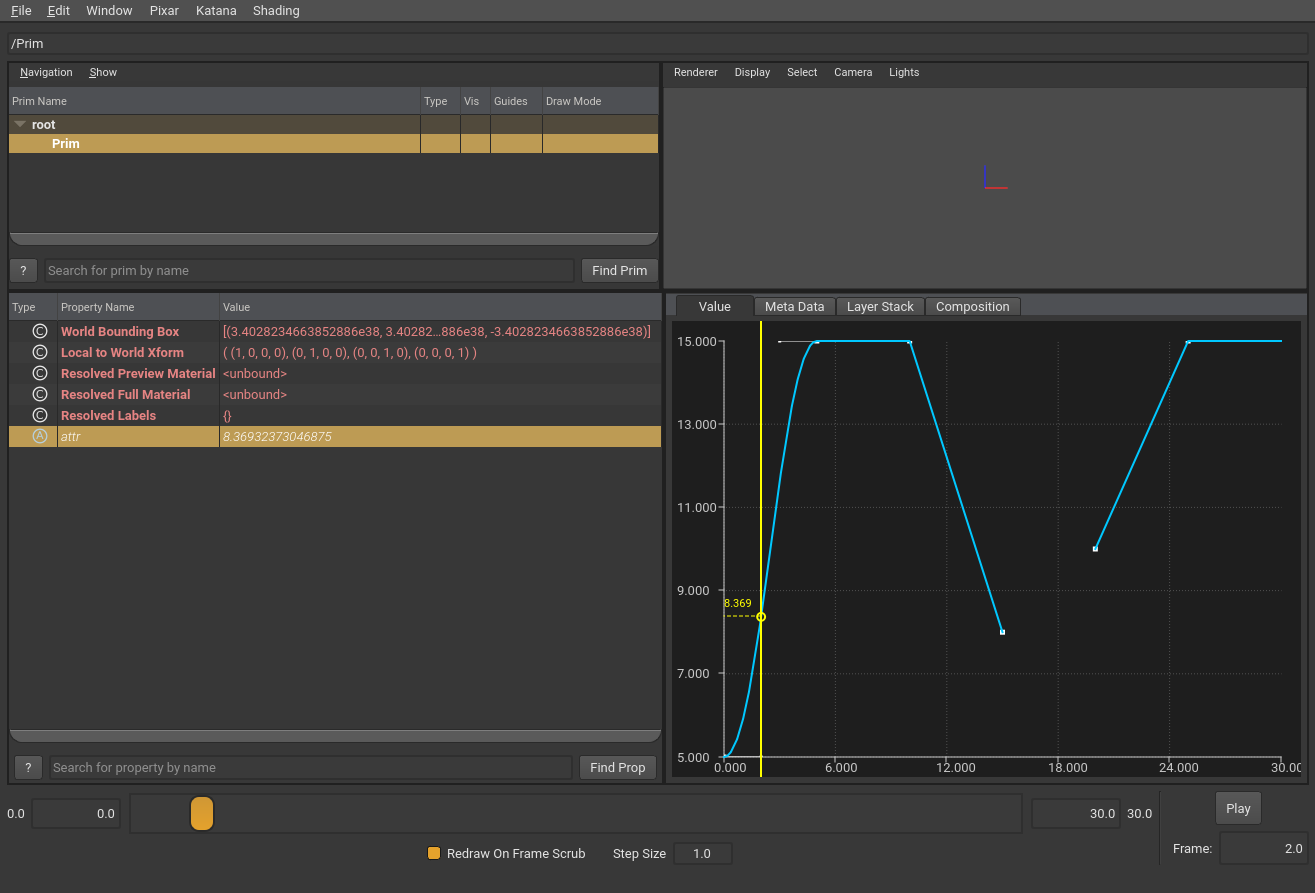
Many DCC tools that support OpenUSD splines include a spline editor or viewer.
Using Value Clips
Value Clips let you partition time-varying animation data across separate USD layers and then sequence, re-sequence, offset, and loop that data — all without restructuring your assets. Value clips work at the value resolution level so that the resulting combined data is indistinguishable from data collected in a single layer (no special API or schema is required to access the resolved/combined data).
Value clips are useful for many scenarios where you need to combine and re-use animation data, but they are particularly useful for two scenarios:
Crowd/background animation at scale: Animators can create animation that can be applied to background characters, and use Value Clips to sequence and loop these animations to efficiently create a large variety of different animation sequences.
Generated/simulation data: Some simulations or procedurally-generated effects generate a large amount of animated data, often writing out each time-step’s worth of data into separate assets. Value clips can be used to stitch these assets together into a continuous animation without impacting the generation process. The OpenUSD toolset includes the usdstitchclips utility that assembles a sequence of file-per-time-step layers into a Value Clips representation.
Value Clips are designed to have reduced performance impact. Animated data layers (“clips”) are accessed as-needed during value resolution, not at stage open, and clips that are already opened are cached until the stage is closed. There is some unavoidable overhead with opening clip layers and processing value clip configuration, however.
Value Clips offer greater flexibility for storing and applying animated data, however encoding value clips on a stage is more complicated than simply authoring animated data directly on attributes.
In the following simple example, we have two clip layers (clip1.usda, clip2.usda) containing TimeSample data that we want to combine and apply to “PrimA”. We specify “clip set” information in the layer that contains PrimA (stage.usda) that points to the clip layers and specifies how the clip layers should be combined. Note that to keep this example simple we are not including a “clip manifest” file, however this isn’t a best practice (see below for more information on clip manifests).
#usda 1.0

def "PrimA"
{
    double attr.timeSamples = {
        0: 0.0,
        5: 3.0,
        10: 5.0
    }
}
#usda 1.0

def "PrimA"
{
    double attr.timeSamples = {
        11: 5.0,
        15: 3.0,
        20: 0.0
    }
}
#usda 1.0
(
    startTimeCode = 0
    endTimeCode = 50
)

def "PrimA" (
    clips = {
        dictionary "clipSet" = {
            # The two clip layers in order: index 0 = clip1, index 1 = clip2
            asset[] assetPaths = [@./clip1.usda@, @./clip2.usda@]

            # active: (stageTime, clipIndex)
            # clip1 is active from timecode 0 to 10, clip2 takes over at frame 11
            double2[] active = [(0, 0), (11, 1)]

            # times: (stageTime, clipTime)
            # we use a direct 1:1 mapping in this example
            double2[] times = [(0, 0), (10, 10), (11, 11), (20, 20)]

            # primPath: the prim path to query for each clip file
            string primPath = "/PrimA"

            # Note that we don't specify manifestAssetPath in this example
        }
    }
    clipSets = ["clipSet"]
)
{
    double attr
}
When stage.usda is loaded and attr is queried, OpenUSD will use the TimeSample data from the clip layers to produce the combined sequence of TimeSamples for attr from time 0 to time 20. The diagram below shows the attr value graph over time, with the contributions from each clip highlighted.
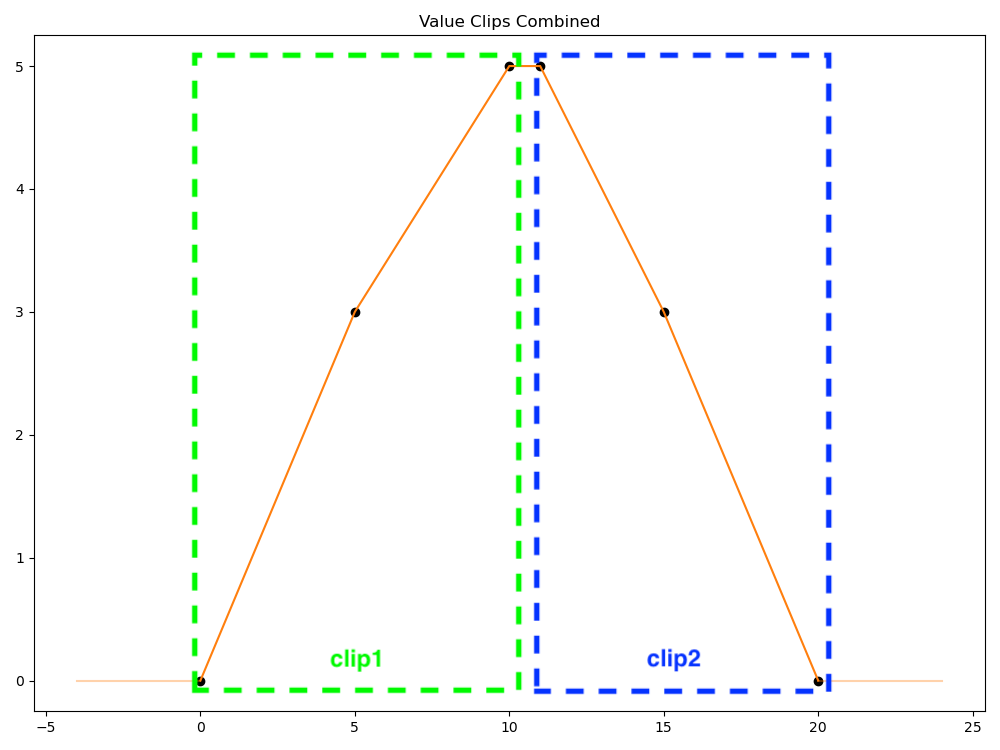
Using Value Clips requires the following steps:
Create one or more clip layers containing animation data.
Create a clip manifest file that lists which attributes use which clip animation data. This is optional, but recommended.
Define a clip set for a prim that specifies a named group of clips, along with configuration on how those clips are sequenced, timed, the manifest for the clips, and more. A prim can have more than one clip set. Clip sets can either explicitly list the included clips in the prim metadata, or use a templated expression to specify the included clips.
Each of these steps is described in sections below.
Defining Clip Layers (Clips)
A clip layer (also referred to as a “clip”) contains animated data for an attribute. While clip layers are authored like a regular USD layer, when used to combine animation data they should only contain direct opinions about the attributes that are providing animated data. OpenUSD will ignore composition arcs, metadata, and default values in clips for performance and scalability reasons.
A clip will typically have a prim and the animated values for an attribute in that prim. All clips that will be combined need to use the same prim name. The following example clip has TimeSample data for PrimA.attr, and spline data for PrimA.attrSpline.
#usda 1.0

def "PrimA"
{
    double attr.timeSamples = {
        11: 5.0,
        15: 3.0,
        20: 0.0
    }
    double attrSpline.spline = {
        bezier,
        0: 0; pre (0, 0); post curve (2, 0),
        5: 3; pre (2, 0); post curve (2, 0),
        10: 5; pre (2, 0); post curve (2, 0)
    }
}
Note that the prim name used in clips does not have to match the prim name/path of the prim the clips will be applied to. OpenUSD provides a way (via clip set configuration, see below) to specify the prim name/path clips use. This allows for creating clips that can be applied to multiple different prims, useful for scenarios like applying the same crowd animations to multiple different crowd character models.
A clip can specify both TimeSamples and Splines for an attribute, but the clip manifest will determine which will be used.
Creating a Clip Manifest
The clip manifest is a USD layer listing which attributes have animated data in the clips. OpenUSD uses the manifest at value resolution time to avoid having to open and inspect clip files directly.
A clip manifest typically is a layer with a prim (using the same prim name used in associated clip layers) specifying the attributes that have animated data in the clips. Like clip layers, metadata, relationships, and composition arcs in the manifest are ignored.
The following simple example manifest indicates that clips only have animated data (TimeSamples in this case) for PrimA.attr. If the associated clips actually have animated attribute data for attributes other than attr, that data will be ignored.
#usda 1.0

over "PrimA" {
    double attr.timeSamples = {}
}
Note
Note that the use of timeSamples = {} in the previous example is handled differently in manifests versus regular USD layers. In a manifest this indicates an attribute should have TimeSample data in clips. In a regular USD layer, this would be ignored and the attribute would be treated as having no authored opinion in the layer.
The manifest can optionally include default values used when a clip has no data for an attribute.
#usda 1.0

over "PrimA" {
    double attr = 10.0
}
If a default value isn’t provided in the manifest, a value block will be used for clips that have no data for an attribute. See also Interpolating Missing Values in Clip Sets.
Manifests default to using TimeSample data from clips if not specified. In the example shown earlier, double attr will default to using TimeSamples in clips. If you want to use Spline data in clips, you must explicitly specify this.
#usda 1.0

over "PrimA" {
    double attr.spline = {}
}
If a manifest specifies both TimeSamples and Splines for the same attribute, TimeSamples will be used.
#usda 1.0

over "PrimA" {
    # Setting both timeSamples and spline for attr, which will result
    # in timeSamples being used from clips.
    double attr.timeSamples = {}
    double attr.spline = {}
}
Note
You cannot “mix” TimeSample data clips and Spline data clips for the same attribute. Manifests will determine which will be used, and if a manifest is not used, either TimeSamples or Splines will be chosen based on criteria described in Working Without Manifests.
You can define value blocks in TimeSample or Spline specifications in a manifest to indicate that clips do not have animated values at the specified times. This is described in more detail in Interpolating Missing Values in Clip Sets.
Working Without Manifests
Clip manifests are optional. OpenUSD can auto-generate manifest information if you omit manifestAssetPath in the clip set information, however this will involve opening and inspecting all clip layers when resolving values. Providing a clip manifest expressly avoids this performance hit. If you want to have OpenUSD generate the manifest rather than creating it manually, the recommended best practice is to generate it once and then set manifestAssetPath to use the generated manifest from then on. To generate the manifest up-front, use the usdstitchclips utility, or use the UsdClipsAPIs (UsdClipsAPI.GenerateClipManifest() or UsdClipsAPI.GenerateClipManifestFromLayers()) from Python and export the resulting layer, as shown in the following Python examples:
stage = Usd.Stage.Open("your_stage.usda")
prim = stage.GetPrimAtPath("/path/to/prim/with/clipset")

# Generate manifest layer from stage information
clipsAPI = Usd.ClipsAPI(prim)
manifest_layer = clipsAPI.GenerateClipManifest("name_of_clipSet")
manifest_layer.Export('generated_manifest_from_stage.usda')

# Alternatively, generate manifest layer from manually opening clip layers
layer1 = Sdf.Layer.FindOrOpen('first_clip_layer.usda')
layer2 = Sdf.Layer.FindOrOpen('second_clip_layer.usda')
# ...open as many clip layers as needed...
manifest_layer = Usd.ClipsAPI.GenerateClipManifestFromLayers(
    [layer1, layer2], "path/to/clip/prim/in/clip/layers")
manifest_layer.Export('generated_manifest_from_layers.usda')
If you use usdstitchclips to generate a manifest, it will also generate a “result.usd” layer containing all the clipset data, which you can sublayer or reference into your scene. See the tool documentation for more details.
Note that when no manifest is provided, or when generating manifests, OpenUSD will use TimeSamples for an attribute if any clip has TimeSample data, even if another clip uses Splines. If all clips for an attribute only use Splines, generated manifests will specify Spline data should be used for that attribute.
Defining a Clip Set
A clip set defines how clips get applied to a prim’s attribute. To specify that attributes on a prim should use value clips, define one or more clip sets on the prim that point to the clips (and manifest) that should be used.
Clip sets are defined as dictionary-valued metadata on a prim. Clip sets may be defined using one of two possible forms: “explicit metadata”, or “templated metadata”. Explicit metadata encodes the exact clips and sequence timings. Templated metadata, on the other hand, authors an expression for encoding the clips and timing and assumes a clip layer naming format that the expression can match.
Template metadata is less powerful than explicit metadata (it doesn’t support features like scaling, looping, or reversing clip data), but provides a compact and easy to debug encoding for situations in which animation is broken up into a large number of regularly named files. This is particularly useful when the clip layers are being generated by an automated process (such as a simulation process).
There are fields used by both explicit and templated metadata, and fields specific to just explicit or templated metadata. If a clip set is defined using both explicit and templated metadata fields, OpenUSD will use the explicit fields and ignore the templated fields.
The following clip set metadata fields are used by both explicit and templated clip sets.
interpolateMissingClipValues: An optional boolean flag indicating whether attribute values should be interpolated from the nearest surrounding clips when the active clip has no authored values for a manifest attribute. This defaults to false, meaning that OpenUSD will not interpolate values from surrounding clips, but instead use a value block (None) or default value specified in the manifest for any data gaps. See Interpolating Missing Values in Clip Sets for more details.
manifestAssetPath: An asset path representing the path to a layer that contains a clip manifest. This field is optional, but recommended. If not provided, OpenUSD will determine which attributes have clip data by inspecting clip layers at run-time.
primPath: A prim path that will be substituted for the stage prim’s path when querying data in the clips. For example, if the clip set is defined on /Prim1, and primPath is set to /ClipPrim, OpenUSD will look for data for /Prim1.attr at /ClipPrim.attr in the clip layers.
The following clip set metadata is used by explicit metadata clip sets only.
active: A list of (stageTime, clipIndex) pairs that represent when a clip in assetPaths is active. The clipIndex is 0-based, so clipIndex 0 would indicate the first clip layer in the assetPaths ordered list is being referred to.
assetPaths: An ordered list of asset paths to clip layers being used in this clip set.
times: An optional list of (stageTime, clipTime) pairs that represent a mapping from stage time to clip time, for whichever clip is active at stageTime. This mapping can be used to scale, offset, and loop clips on a stage. See Retiming Clips for examples.
The following clip set metadata is used by templated metadata clip sets only.
templateAssetPath: A template string used by OpenUSD to create clip layer asset paths. This template string uses the following format: <path>/<basename>.<one or more # symbols for times>.<optionally one or more # symbols for sub-integer times>.<extension: usd, usda, usdc>. For example, “anim/modelAclip.###.###.usd” would match asset paths such as anim/modelAclip.001.001.usd, anim/modelAclip.101.001.usd, etc.
templateStartTime: A double-precision stage time, used by OpenUSD to find the “first” clip layer that will be mapped to the given stage time. The time is substituted into the templateAssetPath string as appropriate. For example, if templateStartTime was 15.5, and templateAssetPath was “./clipFile.###.###.usd”, OpenUSD would look for ./clipFile.015.005.usd.
templateEndTime: A double-precision stage time, used by OpenUSD to find the “last” clip layer that will be mapped to the given stage time. Like templateStartTime, the time is substituted into the templateAssetPath string as appropriate.
templateStride: A double-precision number specifying the stride used to increment values from templateStartTime to templateEndTime, used by OpenUSD to find clip layer assets. Stride must be greater than 0 (and there is no default), which means the time increments will always be positive. For example, if templateStride was set to 10, templateStartTime to 15, and templateEndTime to 60, OpenUSD would look for clip assets (using a templateAssetPath of “./clipFile.###.usd”) with paths ./clipFile.015.usd, ./clipFile.025.usd, ./clipFile.035.usd, ./clipFile.045.usd, ./clipFile.055.usd. Note that in this example OpenUSD will not look for ./clipFile.060.usd, even though templateEndTime is 60, because the templateStartTime + templateStride cadence will never evaluate to 60.
templateActiveOffset: A double-precision number used by OpenUSD as a stage-time offset for when the clips are “applied”. Normally clip layers are active based on their encoded stage times (e.g. clipFile.001.usd would be active at stage time 1). Adding a templateActiveOffset shifts the active time for each clip layer, so a templateActiveOffset of 1 would make clipFile.001.usd active at stage time 2. Note that templateActiveOffset can be negative, but the absolute value of templateActiveOffset cannot be greater than templateStride. See Retiming Clips below for an example using templateActiveOffset.
All clip metadata sits in the clips dictionary on a prim. The following example shows a clip set named “clipSet” using explicit metadata:
def "PrimA" (
    clips = {
        dictionary "clipSet" = {

            # Specify if OpenUSD should interpolate from "neighboring" clips
            # for clip data gaps. Defaults to false (None is used for missing
            # data, or the default if specified in the manifest)
            bool interpolateMissingClipValues = false

            # The prim path to query for each clip layer asset
            string primPath = "/PrimA"

            # Specify the path for the manifest file
            # This field is optional -- if omitted, OpenUSD figures out the
            # attributes at run-time.
            asset manifestAssetPath = @./doc_valueClips_manifest.usda@

            # ** fields for explicit metadata clip sets **

            # pairs of (stageTime, clipIndex) indicating stage times a clip
            # is active. In this example, clip1 is active from timecode 0 to
            # 10, clip2 takes over at frame 11
            double2[] active = [(0, 0), (11, 1)]

            # Ordered list of clip layer assets for this clip set
            asset[] assetPaths = [@./clip1.usda@, @./clip2.usda@]

            # pairs of (stageTime, clipTime) that specify a mapping of stage
            # time to clip times. In this example we have a basic 1:1 mapping
            # using two entries per clip, one at each boundary.
            double2[] times = [(0, 0), (10, 10), (11, 11), (20, 20)]
        }
    }
    clipSets = ["clipSet"]
)
{
}
The following templated metadata clip set example defines a single clip set named “clipSet”, that uses a templateAssetPath of “./clip.###.usda”. Based on the templated metadata values for this clip set, OpenUSD will look for clip layer asset paths of clip.001.usda, clip.002.usda, and clip.003.usda, which will be active at stage times 1, 2, and 3 respectively.
def "PrimA" (
    clips = {
        dictionary "clipSet" = {

            # Specify if OpenUSD should interpolate from "neighboring" clips
            # for clip data gaps. Defaults to false (None is used for missing
            # data, or the default if specified in the manifest)
            bool interpolateMissingClipValues = false

            # The prim path to query for each clip layer asset
            string primPath = "/PrimA"

            # Specify the path for the manifest file
            # This field is optional -- if omitted, OpenUSD figures out the
            # attributes at run-time.
            asset manifestAssetPath = @./doc_valueClips_manifest.usda@

            # ** fields for templated metadata clip sets **

            # The expression used to match clip asset paths.
            # The hashes will be replaced with times.
            string templateAssetPath = "./clip.###.usda"

            # The template start time. USD will take this and create an asset
            # name with the templateAssetPath, e.g. "clip.001.usda"
            double templateStartTime = 1

            # The template end time. USD will take this and create an asset
            # name with the templateAssetPath, e.g. "clip.003.usda"
            # (this is a required field)
            double templateEndTime = 3

            # The template stride. USD uses this for asset paths again, starting
            # from startTime and going up to endTime, incrementing by stride,
            # e.g. "clip.001.usda", "clip.002.usda", "clip.003.usda".
            # Stride must be greater than 0.
            double templateStride = 1

            # template active offset. This adds an offset for the "active" stage
            # time for a clip. By default the active time for a templated clip
            # is based on the stage time from USD, e.g. template clip.001.usda
            # would be active at stage time 1, clip.002.usda would be active at
            # stage time 2, etc. Adding an offset shifts when all clips would be
            # active. This field is optional and can be negative.
            double templateActiveOffset = 0
        }
    }
    clipSets = ["clipSet"]
)
{
}
Retiming Clips
When specifying the sequence of clips to be applied with explicit metadata clip sets, you can specify a mapping of stage time to clip time that can be used to retime clips. For example, suppose you had the following clip layer that contains timesamples at clip frames 0, 5, and 10.
#usda 1.0

def "PrimA"
{
    double attr.timeSamples = {
        0: 0.0,
        5: 3.0,
        10: 5.0
    }
}
In your clip set, you would include this clip layer as an active clip at stage time 0, but then remap the clip timing so that clip time samples at clip time 0 don’t take effect until stage time 3 (effectively offsetting the clip by 3 frames), and the clip samples at clip time 10 map to stage time 8 (effectively scaling the clip by half).
# active: (stageTime, clipIndex)
double2[] active = [(0, 0)]

# times: (stageTime, clipTime)
double2[] times = [(3, 0), (8, 10)]
Note
If Layer Offsets are used with prims with clip sets, clip set times are evaluated first without Layer Offset changes, and Layer Offset changes are applied to the value resolution results. See Layer Offsets and Retimed Clips below.
When an attribute value at time 3 is requested, OpenUSD will retrieve the time sample value authored at time 0 in the active clip, and at time 8 OpenUSD will ask for the value authored at time 10. Any values at times between these entries will use clip interpolation, in this case linear interpolation of a double-valued TimeSample.
Note that retiming a clip that has Bezier Spline data will potentially scale and offset knot tangent information as needed, similar to how tangents can be offset and scaled by layer offsets or automatic layer time scaling.
You can also use times clip set information to loop/repeat clips. The following times entries loop the given clip twice, once from stage times 0 to 10, and again from stage times 10 to 20.
double2[] times = [(0, 0), (10, 10), (10, 0), (20, 10)]
You can even reverse a clip using times entries. The following example at stage time 0 uses the last TimeSample from the clip, and at stage time 10 uses the first timeSample from the clip, effectively reversing the clip.
double2[] times = [(0, 10), (10, 0)]
When using templated metadata clip sets, you have limited control over retiming clips, as you can’t directly author the stage-to-clip time mapping. You can provide an optional time offset that shifts when every clip is active in the stage, which is useful if you want every clip to have its animated values “persist” past (or before) their normal stage time. For example, the following three clip layers have TimeSamples for times 1, 2, and 3.
#usda 1.0

def "PrimA"
{
    double attr.timeSamples = {
        1: 5.0
    }
}
#usda 1.0

def "PrimA"
{
    double attr.timeSamples = {
        2: 10.0
    }
}
#usda 1.0

def "PrimA"
{
    double attr.timeSamples = {
        3: 7.0
    }
}
The stage has “PrimA” with a clip set defined using a templateStartTime of 1, templateEndTime of 3, templateStride of 1, and a templateActiveOffset of 1.
dictionary "clipSet" = {
    string primPath = "/PrimA"
    asset manifestAssetPath = @./clips_manifest.usda@
    string templateAssetPath = "./clip.###.usda"
    double templateStartTime = 1
    double templateEndTime = 3
    double templateStride = 1
    double templateActiveOffset = 1
}
The offset results in each clip layer being active 1 timecode later in the stage. Without the offset, PrimA.attr would have a value of 10 at time 2 (from clip.002.usda). With the offset, clip.002.usda is active one timecode later at time 3, so PrimA.attr at time 2 would be 5.0, coming from the active clip at that time, which is clip.001.usda.
Layer Offsets and Retimed Clips
Layer offsets are applied after value clip timing calculations. Clip set metadata that uses stage times will not have layer offset changes applied to those metadata. Layer offset changes will be applied after Value Clip resolution has been evaluated.
If you’re using templated metadata clip sets, layer offsets do not affect how OpenUSD generates the set of clip layer asset paths. The following example layer1.usda layer has a prim with a clip set that defines a templateStartTime and templateEndTime of 1 and 3.
#usda 1.0
(
    startTimeCode = 0
    endTimeCode = 50
)

def "PrimA" (
    clips = {
        dictionary "clipSet" = {
            string primPath = "/PrimA"
            asset manifestAssetPath = @./doc_valueClips_manifest.usda@
            string templateAssetPath = "./clip.###.usda"
            double templateStartTime = 1
            double templateEndTime = 3
            double templateStride = 1
        }
    }
    clipSets = ["clipSet"]
)
{
    double attr
}
This layer is sublayered using a Layer Offset with an offset of 10.
#usda 1.0
(
    startTimeCode = 0
    endTimeCode = 50
    subLayers = [
      @layer1.usda@ (offset = 10)
    ]
)
OpenUSD will evaluate the clip set information first, looking for clip layer asset paths at clip.001.usda, clip.002.usda, clip.003.usda (not offset paths at clip.011.usda, clip.012.usda, etc.). After the animated data is loaded from these clips, the results are then offset by 10 in the stage.
Interpolating Missing Values in Clip Sets
The list of clips in a clip set, along with any retiming of clip times, may result in a set of animated data for an attribute that has “gaps” — stage times where no clip has values (authored or interpolated). You can configure what strategy OpenUSD uses when a value at a gap time is needed.
By default, if a value clip does not contain animated data for an attribute, the value for the attribute will be the default value authored in the clip manifest, if any. If no default value has been authored, the value will be a value block. In the following example, clip1.usda and clip2.usda are active at times 1 and 2 respectively. clip_manifest.usda defines the attribute with animated data (“attr”) and a default value for that attribute (10.0). Because clip1.usda has no animated data for time 1, the value for PrimA.attr at time 1 will be 10.0, based on the default set in clip_manifest.usda.
#usda 1.0

def "PrimA"
{
}
#usda 1.0

def "PrimA"
{
    double attr.timeSamples = {
        2: 5.0
    }
}
#usda 1.0

def "PrimA" {
    double attr = 10.0
}
However, if the clip set defines interpolateMissingClipValues as true, OpenUSD will attempt to use interpolation for “gap” values. To do this, OpenUSD will search forward and backwards from the active clip at the gap time to find the nearest clips that contain authored animated values. The final value will be interpolated from these animated values. Using the previous example, with interpolateMissingClipValues = true, the value for PrimA.attr at time 1 will be 5, using held interpolation from the value from clip2.usda.
OpenUSD’s search to find the nearest clips might incur a performance hit. You can accelerate this search by specifying value blocks in the manifest at the active time(s) for each clip that does not have animated values for the given attribute. OpenUSD will use this to determine which clip layers have animated values without having to open the clip layers themselves. In the following example we replace the clip manifest from the previous example with a manifest that marks that the clip active at stage time 1 does not have any TimeSamples for attr, and similarly does not have spline data at stage time 1 for attrSpline.
#usda 1.0

def "PrimA" {
    double attr = 10.0
    double attr.timeSamples = {
        1: None
    }

    double attrSpline.spline = {
        1:0; post none
    }
}
Working With Multiple Clip Sets
A prim can have multiple clip sets defined. This is useful for situations where you have multiple sets of animation that need to be distinct, but combined on a model. The following example has two clip sets, “clipSetArms” and “clipSetLegs”, that apply clips for separate sets of attributes on a model.
def "PrimA" (
    clips = {
        dictionary "clipSetArms" = {
            string primPath = "/ModelArms"
            asset manifestAssetPath = @./arms_manifest.usda@
            double2[] active = [(0, 0), (11, 1)]
            asset[] assetPaths = [@./armsClip1.usda@, @./armsClip2.usda@]
            double2[] times = [(0, 0), (10, 10), (11, 11), (20, 20)]
        }
        dictionary "clipSetLegs" = {
            string primPath = "/ModelLegs"
            asset manifestAssetPath = @./legs_manifest.usda@
            double2[] active = [(0, 0), (15, 1)]
            asset[] assetPaths = [@./legsClip1.usda@, @./legsClip2.usda@]
            double2[] times = [(0, 0), (14, 14), (15, 11), (22, 22)]
        }
    }
)
{
}
If multiple clip sets provide animated data for the same attribute(s), OpenUSD uses the first clip set in the order in the clipSets list-op metadata field, if provided. If the clipSets field is not provided, OpenUSD by default orders the clip sets lexicographically and will choose the lexicographically “first” clip set for those attributes. In the following example, we have two clip sets which have animated data for the same attribute. The clipSets field is provided to indicate the desired order.
#usda 1.0
(
    startTimeCode = 0
    endTimeCode = 50
)

def "PrimA" (
    clips = {
        dictionary "clipSetA" = {
            string primPath = "/Model"
            asset manifestAssetPath = @./a_manifest.usda@
            asset[] assetPaths = [@./aClip1.usda@, @./aClip2.usda@]
            double2[] active = [(0, 0), (11, 1)]
            double2[] times = [(0, 0), (10, 10), (11, 11), (20, 20)]
        }
        dictionary "clipSetZ" = {
            string primPath = "/Model"
            asset manifestAssetPath = @./z_manifest.usda@
            asset[] assetPaths = [@./zClip1.usda@, @./zClip2.usda@]
            double2[] active = [(0, 0), (11, 1)]
            double2[] times = [(0, 0), (10, 10), (11, 11), (20, 20)]
        }
    }
    clipSets = ["clipSetZ", "clipSetA"]
)
{
}
The clips dictionary is composed according to the rules for dictionary-valued metadata, so you can define clip sets in various layers and compose them together, or sparsely override metadata in clip sets non-destructively. You can also use list-operations (delete, prepend, append) to modify the clip set names and ordering in the clipSets field. The following example uses a reference to our previous example, adds a new “debugClipSet” and prepends “debugClipSet” to clipSets so that OpenUSD will use it as the “first” clipSet.
#usda 1.0
(
    startTimeCode = 0
    endTimeCode = 50
)

over "PrimA" (
    prepend references = @./multipleClipSetsExample.usda@</PrimA>
    # Prepend a new clip set (that we'll define here)
    prepend clipSets = ["debugClipSet"]
    clips = {
       # Define a "debugClipSet" that is similar to "clipSetA" in
       # multipleClipSetsExample.usda, but offsets the clip times by 5
       dictionary "debugClipSet" = {
            string primPath = "/PrimA"
            asset manifestAssetPath = @./a_manifest.usda@
            asset[] assetPaths = [@./aClip1.usda@, @./aClip2.usda@]
            double2[] active = [(0, 0), (11, 1)]
            double2[] times = [(5, 0), (15, 10), (16, 11), (25, 20)]
        }
    }
)
{
}
Note that when sparsely overriding clipset metadata, if you override the anchor point this can impact how layer offsets are applied, as described here.
Using Spline Extrapolation With Value Clips
Clips that use spline extrapolation will have extrapolation settings ignored except for the first and last clips. For the first clip, any pre-extrapolation settings will be applied. Similarly, for the last clip, post-extrapolation settings will be applied. The extrapolation will be applied using the spline data for that clip (including any loop boundary settings).
In the following example, we have a clip set (valueClips_extrapolation.usda) that uses three spline based clips (extrapolation_clip1.usda, extrapolation_clip2.usda, extrapolation_clip3.usda) with no special re-timings. extrapolation_clip1.usda specifies a looping reset pre-extrapolation, which will repeat the full spline from that clip for all times before the clip set. extrapolation_clip3.usda specifies a looping reset post-extrapolation which will repeat the clip’s spline for all times after the clip set.
#usda 1.0
(
    startTimeCode = -50
    endTimeCode = 150
)

def "PrimA" (
    clips = {
        dictionary "clipSet" = {
            string primPath = "/PrimA"
            asset manifestAssetPath = @./extrapolation_manifest.usda@
            bool interpolateMissingClipValues = true
            double2[] active = [(0, 0), (11, 1), (21,2)]
            asset[] assetPaths = [@./extrapolation_clip1.usda@, @./extrapolation_clip2.usda@, @./extrapolation_clip3.usda@]
        }
    }
    clipSets = ["clipSet"]
)
{
    double attr
}
#usda 1.0

def "PrimA"
{
    double attr.spline = {
        bezier,
        pre: loop reset,
        0: 0; pre (2, 0); post curve (2, 0),
        5: 3; pre (2, 0); post curve (2, 0),
        10: 0; pre (2, 0); post curve (2, 0),
    }
}
#usda 1.0

def "PrimA"
{
    double attr.spline = {
        11: 0; post linear,
        12: 2; post linear,
        15: -1; post linear,
        18: 2; post linear,
        20: 0; post linear,
    }
}
#usda 1.0

def "PrimA"
{
    double attr.spline = {
        bezier,
        post: loop reset,
        21: 0; pre (2, 0); post curve (2, 0),
        25: -3; pre (2, 0); post curve (2, 0),
        30: 0; pre (2, 0); post curve (2, 0),
    }
}
#usda 1.0

over "PrimA"
{
    double attr.spline = {}
}
The resulting animated values for PrimA.attr will look something like the following.
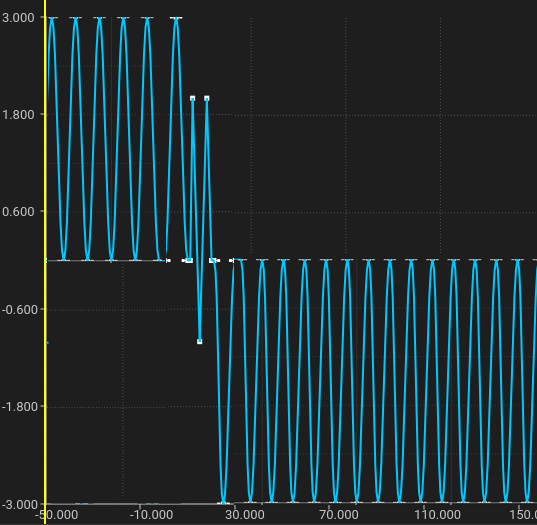
OpenUSD will try to preserve a clip’s spline shape for looping extrapolation. In scenarios where clip sequences result in dual-valued knots at the clip boundaries, OpenUSD will utilize dual-valued knot preValues as necessary (e.g. when calculating the offset for a repeat looping pre-extrapolation).